
This chapter describes how to configure Border Gateway Protocol (BGP). For a complete description of the BGP commands in this chapter, refer to the “BGP Commands” chapter of the Cisco IOS IP Command Reference, Volume 2 of 3: Routing Protocols. To locate documentation of other commands that appear in this chapter, use the command reference master index, or search online. For multiprotocol BGP configuration information and examples, refer to the “Configuring Multiprotocol BGP Extensions for IP Multicast” chapter of the Cisco IOS IP Configuration Guide. For multiprotocol BGP command descriptions, refer to the “Multiprotocol BGP Extensions for IP Multicast Commands” chapter of the Cisco IOS IP Command Reference.
BGP, as defined in RFCs 1163 and 1267, is an Exterior Gateway Protocol (EGP). It allows you to set up an interdomain routing system that automatically guarantees the loop-free exchange of routing information between autonomous systems.
For protocol-independent features, see the chapter “Configuring IP Routing Protocol-Independent Features” in this book.
To identify the hardware platform or software image information associated with a feature, use the Feature Navigator on Cisco.com to search for information about the feature or refer to the software release notes for a specific release. For more information, see the “Identifying Supported Platforms” section in the “Using Cisco IOS Software” chapter in this book.
The Cisco BGP Implementation
In BGP, each route consists of a network number, a list of autonomous systems that information has passed through (called the autonomous system path), and a list of other path attributes. We support BGP Versions 2, 3, and 4, as defined in RFCs 1163, 1267, and 1771, respectively.
The primary function of a BGP system is to exchange network reachability information with other BGP systems, including information about the list of autonomous system paths. This information can be used to construct a graph of autonomous system connectivity from which routing loops can be pruned and with which autonomous system-level policy decisions can be enforced.
You can configure the value for the Multi Exit Discriminator (MED) metric attribute using route maps. (The name of this metric for BGP Versions 2 and 3 is INTER_AS_METRIC.) When an update is sent to an internal BGP (iBGP) peer, the MED is passed along without any change. This action enables all the peers in the same autonomous system to make a consistent path selection.
A next hop router address is used in the NEXT_HOP attribute, regardless of the autonomous system of that router. The Cisco IOS software automatically calculates the value for this attribute.
Transitive, optional path attributes are passed along to other BGP-speaking routers.
BGP Version 4 supports classless interdomain routing (CIDR), which lets you reduce the size of your routing tables by creating aggregate routes, resulting in supernets. CIDR eliminates the concept of network classes within BGP and supports the advertising of IP prefixes. CIDR routes can be carried by Open Shortest Path First (OSPF), Enhanced IGRP (EIGRP), and Intermediate System-to-Intermediate System (ISIS)-IP, and Routing Information Protocol (RIP).
See the “BGP Route Map Examples” section at the end of this chapter for examples of how to use route maps to redistribute BGP Version 4 routes.
How BGP Selects Paths
A router running Cisco IOS Release 12.0 or later does not select or use an iBGP route unless both of the following conditions are true:
•![]() The router has a route available to the next hop router:
The router has a route available to the next hop router:
•![]() The router has received synchronization via an IGP (unless IGP synchronization has been disabled).
The router has received synchronization via an IGP (unless IGP synchronization has been disabled).
BGP bases its decision process on the attribute values. When faced with multiple routes to the same destination, BGP chooses the best route for routing traffic toward the destination. The following process summarizes how BGP chooses the best route.
1. ![]() If the next hop is inaccessible, do not consider it.
If the next hop is inaccessible, do not consider it.
This decision is why it is important to have an IGP route to the next hop.
2. ![]() If the path is internal, synchronization is enabled, and the route is not in the IGP, do not consider the route.
If the path is internal, synchronization is enabled, and the route is not in the IGP, do not consider the route.
3. ![]() Prefer the path with the largest weight (weight is a Cisco proprietary parameter).
Prefer the path with the largest weight (weight is a Cisco proprietary parameter).
4. ![]() If the routes have the same weight, prefer the route with the largest local preference.
If the routes have the same weight, prefer the route with the largest local preference.
5. ![]() If the routes have the same local preference, prefer the route that was originated by the local router.
If the routes have the same local preference, prefer the route that was originated by the local router.
For example, a route might be originated by the local router using the network bgp router configuration command, or through redistribution from an IGP.
6. ![]() If the local preference is the same, or if no route was originated by the local router, prefer the route with the shortest autonomous system path.
If the local preference is the same, or if no route was originated by the local router, prefer the route with the shortest autonomous system path.
7. ![]() If the autonomous system path length is the same, prefer the route with the lowest origin code (IGP < EGP < INCOMPLETE).
If the autonomous system path length is the same, prefer the route with the lowest origin code (IGP < EGP < INCOMPLETE).
8. ![]() If the origin codes are the same, prefer the route with the lowest MED metric attribute.
If the origin codes are the same, prefer the route with the lowest MED metric attribute.
This comparison is only made if the neighboring autonomous system is the same for all routes considered, unless the bgp always-compare-med router configuration command is enabled.

Note ![]() The most recent Internet Engineering Task Force (IETF) decision regarding BGP MED assigns a value of infinity to the missing MED, making the route lacking the MED variable the least preferred. The default behavior of BGP routers running Cisco IOS software is to treat routes without the MED attribute as having a MED of 0, making the route lacking the MED variable the most preferred. To configure the router to conform to the IETF standard, use the bgp bestpath med missing-as-worst router configuration command.
The most recent Internet Engineering Task Force (IETF) decision regarding BGP MED assigns a value of infinity to the missing MED, making the route lacking the MED variable the least preferred. The default behavior of BGP routers running Cisco IOS software is to treat routes without the MED attribute as having a MED of 0, making the route lacking the MED variable the most preferred. To configure the router to conform to the IETF standard, use the bgp bestpath med missing-as-worst router configuration command.
9. ![]() Prefer the external BGP (eBGP) path over the iBGP path.
Prefer the external BGP (eBGP) path over the iBGP path.
All confederation paths are considered internal paths.
10. ![]() Prefer the route that can be reached through the closest IGP neighbor (the lowest IGP metric).
Prefer the route that can be reached through the closest IGP neighbor (the lowest IGP metric).
The router will prefer the shortest internal path within the autonomous system to reach the destination (the shortest path to the BGP next hop).
11. ![]() If the following conditions are all true, insert the route for this path into the IP routing table:
If the following conditions are all true, insert the route for this path into the IP routing table:
–![]() Both the best route and this route are external.
Both the best route and this route are external.
–![]() Both the best route and this route are from the same neighboring autonomous system.
Both the best route and this route are from the same neighboring autonomous system.
–![]() The maximum-paths router configuration command is enabled.
The maximum-paths router configuration command is enabled.
Note ![]() eBGP load sharing can occur at this point, which means that multiple paths can be installed in the forwarding table.
eBGP load sharing can occur at this point, which means that multiple paths can be installed in the forwarding table.
12. ![]() If multipath is not enabled, prefer the route with the lowest IP address value for the BGP router ID.
If multipath is not enabled, prefer the route with the lowest IP address value for the BGP router ID.
The router ID is usually the highest IP address on the router or the loopback (virtual) address, but might be implementation-specific.
BGP Multipath Support
When a BGP speaker learns two identical eBGP paths for a prefix from a neighboring autonomous system, it will choose the path with the lowest route ID as the best path. This best path is installed in the IP routing table. If BGP multipath support is enabled and the eBGP paths are learned from the same neighboring autonomous system, instead of one best path being picked, multiple paths are installed in the IP routing table.
During packet switching, depending on the switching mode, either per-packet or per-destination load balancing is performed among the multiple paths. A maximum of six paths is supported. The maximum-paths router configuration command controls the number of paths allowed. By default, BGP will install only one path to the IP routing table.
Basic BGP Configuration Task List
The BGP configuration tasks are divided into basic and advanced tasks, which are described in the following sections. The basic tasks described in the first two sections are required to configure BGP; the basic and advanced tasks in the remaining sections are optional:
•![]() Enabling BGP Routing (Required)
Enabling BGP Routing (Required)
•![]() Configuring BGP Neighbors (Required)
Configuring BGP Neighbors (Required)
•![]() Managing Routing Policy Changes (Optional)
Managing Routing Policy Changes (Optional)
•![]() Verifying BGP Soft Reset (Optional)
Verifying BGP Soft Reset (Optional)
•![]() Configuring BGP Interactions with IGPs (Optional)
Configuring BGP Interactions with IGPs (Optional)
•![]() Configuring BGP Weights (Optional)
Configuring BGP Weights (Optional)
•![]() Disabling Autonomous System Path Comparison (Optional)
Disabling Autonomous System Path Comparison (Optional)
•![]() Configuring BGP Route Filtering by Neighbor (Optional)
Configuring BGP Route Filtering by Neighbor (Optional)
•![]() Configuring BGP Filtering Using Prefix Lists (Optional)
Configuring BGP Filtering Using Prefix Lists (Optional)
•![]() Configuring BGP Path Filtering by Neighbor (Optional)
Configuring BGP Path Filtering by Neighbor (Optional)
•![]() Disabling Next Hop Processing on BGP Updates (Optional)
Disabling Next Hop Processing on BGP Updates (Optional)
•![]() Configuring the BGP Version (Optional)
Configuring the BGP Version (Optional)
•![]() Configuring the MED Metric (Optional)
Configuring the MED Metric (Optional)
Advanced BGP Configuration Task List
Advanced, optional BGP configuration tasks are described in the following sections:
•![]() Using Route Maps to Modify Updates (Optional)
Using Route Maps to Modify Updates (Optional)
•![]() Resetting eBGP Connections Immediately upon Link Failure (Optional)
Resetting eBGP Connections Immediately upon Link Failure (Optional)
•![]() Configuring Aggregate Addresses (Optional)
Configuring Aggregate Addresses (Optional)
•![]() Disabling Automatic Summarization of Network Numbers (Optional)
Disabling Automatic Summarization of Network Numbers (Optional)
•![]() Configuring BGP Community Filtering (Optional)
Configuring BGP Community Filtering (Optional)
•![]() Configuring BGP Conditional Advertisement (Optional)
Configuring BGP Conditional Advertisement (Optional)
•![]() Configuring a Routing Domain Confederation (Optional)
Configuring a Routing Domain Confederation (Optional)
•![]() Configuring a Route Reflector (Optional)
Configuring a Route Reflector (Optional)
•![]() Configuring BGP Peer Groups (Optional)
Configuring BGP Peer Groups (Optional)
•![]() Disabling a Peer or Peer Group (Optional)
Disabling a Peer or Peer Group (Optional)
•![]() Indicating Backdoor Routes (Optional)
Indicating Backdoor Routes (Optional)
•![]() Modifying Parameters While Updating the IP Routing Table (Optional)
Modifying Parameters While Updating the IP Routing Table (Optional)
•![]() Setting Administrative Distance (Optional)
Setting Administrative Distance (Optional)
•![]() Adjusting BGP Timers (Optional)
Adjusting BGP Timers (Optional)
•![]() Changing the Default Local Preference Value (Optional)
Changing the Default Local Preference Value (Optional)
•![]() Redistributing Network 0.0.0.0 (Optional)
Redistributing Network 0.0.0.0 (Optional)
•![]() Configuring the Router to Consider a Missing MED as Worst Path (Optional)
Configuring the Router to Consider a Missing MED as Worst Path (Optional)
•![]() Selecting Path Based on MEDs from Other Autonomous Systems (Optional)
Selecting Path Based on MEDs from Other Autonomous Systems (Optional)
•![]() Configuring the Router to Use the MED to Choose a Path from Subautonomous System Paths (Optional)
Configuring the Router to Use the MED to Choose a Path from Subautonomous System Paths (Optional)
•![]() Configuring the Router to Use the MED to Choose a Path in a Confederation (Optional)
Configuring the Router to Use the MED to Choose a Path in a Confederation (Optional)
•![]() Configuring Route Dampening (Optional)
Configuring Route Dampening (Optional)
For information on configuring features that apply to multiple IP routing protocols (such as redistributing routing information), see the chapter “Configuring IP Routing Protocol-Independent Features.”
Configuring Basic BGP Features
The tasks described in this section are for configuring basic BGP features.
Enabling BGP Routing
To enable BGP routing and establish a BGP routing process, use the following commands beginning in global configuration mode:
Note ![]() For exterior protocols, a reference to an IP network from the network router configuration command controls only which networks are advertised. This behavior is in contrast to IGP, such as IGRP, which also use the network command to determine where to send updates.
For exterior protocols, a reference to an IP network from the network router configuration command controls only which networks are advertised. This behavior is in contrast to IGP, such as IGRP, which also use the network command to determine where to send updates.
Note ![]() The network command is used to inject IGP routes into the BGP table. The network-mask portion of the command allows supernetting and subnetting. The resources of the router, such as configured NVRAM or RAM, determine the upper limit of the number of network commands you can use. Alternatively, you could use the redistribute router configuration command to achieve the same result.
The network command is used to inject IGP routes into the BGP table. The network-mask portion of the command allows supernetting and subnetting. The resources of the router, such as configured NVRAM or RAM, determine the upper limit of the number of network commands you can use. Alternatively, you could use the redistribute router configuration command to achieve the same result.
Configuring BGP Neighbors
Like other EGPs, BGP must completely understand the relationships it has with its neighbors. Therefore, this task is required.
BGP supports two kinds of neighbors: internal and external. Internal neighbors are in the same autonomous system; external neighbors are in different autonomous systems. Normally, external neighbors are adjacent to each other and share a subnet, while internal neighbors may be anywhere in the same autonomous system.
To configure BGP neighbors, use the following command in router configuration mode:
|
|
|
|---|---|
|
Router(config-router)# neighbor {ip-address | peer-group-name} remote-as as-number |
Specifies a BGP neighbor. |
See the “BGP Neighbor Configuration Examples” section at the end of this chapter for an example of configuring BGP neighbors.
Managing Routing Policy Changes
Routing policies for a peer include all the configurations such as route-map, distribute-list, prefix-list, and filter-list that may impact inbound or outbound routing table updates. Whenever there is a change in the routing policy, the BGP session must be soft cleared, or soft reset, for the new policy to take effect. Performing inbound reset enables the new inbound policy to take effect. Performing outbound reset causes the new local outbound policy take effect without resetting the BGP session. As a new set of updates is sent during outbound policy reset, a new inbound policy of the neighbor can also take effect.
There are two types of reset, hard reset and soft reset. Table 8 lists their advantages and disadvantages.
|
|
|
|
|---|---|---|
|
Hard reset |
No memory overhead. |
The prefixes in the BGP, IP, and Forwarding Information Base (FIB) tables provided by the neighbor are lost. Not recommended. |
|
Outbound soft reset |
No configuration, no storing of routing table updates. The procedure for an outbound reset is described in the section “Configuring BGP Soft Reset Using Stored Routing Policy Information.” |
Does not reset inbound routing table updates. |
|
Dynamic inbound soft reset |
Does not clear the BGP session and cache. Does not require storing of routing table updates, and has no memory overhead. |
Both BGP routers must support the route refresh capability (in Cisco IOS Release 12.1 and later releases). |
|
Configured inbound soft reset (uses the neighbor soft-reconfiguration router configuration command) |
Can be used when both BGP routers do not support the automatic route refresh capability. |
Requires preconfiguration. Stores all received (inbound) routing policy updates without modification; is memory-intensive. Recommended only when absolutely necessary, such as when both BGP routers do not support the automatic route refresh capability. |
Once you have defined two routers to be BGP neighbors, they will form a BGP connection and exchange routing information. If you subsequently change a BGP filter, weight, distance, version, or timer, or make a similar configuration change, you must reset BGP connections for the configuration change to take effect.
A soft reset updates the routing table for inbound and outbound routing updates. Cisco IOS software Release 12.1 and later releases support soft reset without any prior configuration. This soft reset allows the dynamic exchange of route refresh requests and routing information between BGP routers, and the subsequent re-advertisement of the respective outbound routing table. There are two types of soft reset:
•![]() When soft reset is used to generate inbound updates from a neighbor, it is called dynamic inbound soft reset.
When soft reset is used to generate inbound updates from a neighbor, it is called dynamic inbound soft reset.
•![]() When soft reset is used to send a new set of updates to a neighbor, it is called outbound soft reset.
When soft reset is used to send a new set of updates to a neighbor, it is called outbound soft reset.
To use soft reset without preconfiguration, both BGP peers must support the soft route refresh capability, which is advertised in the OPEN message sent when the peers establish a TCP session. Routers running Cisco IOS software releases prior to Release 12.1 do not support the route refresh capability and must clear the BGP session using the neighbor soft-reconfiguration router configuration command, described in “Configuring BGP Soft Reset Using Stored Routing Policy Information.” Clearing the BGP session in this way will have a negative impact upon network operations and should only be used as a last resort.
Resetting a Router Using BGP Dynamic Inbound Soft Reset
If both the local BGP router and the neighbor router support the route refresh capability, you can perform a dynamic soft inbound reset. This type of reset has the following advantages over a soft inbound reset using stored routing update information:
•![]() Does not require preconfiguration
Does not require preconfiguration
•![]() Does not require additional memory for storing routing update information
Does not require additional memory for storing routing update information
To determine whether a router supports the route refresh capability, use the show ip bgp neighborscommand in EXEC mode:
If all the BGP routers support the route refresh capability, you can use the dynamic soft reset method for resetting the inbound routing table. To perform a dynamic soft reset of the inbound routing table, use the following command in EXEC mode:
See the “BGP Soft Reset Examples” section at the end of this chapter for examples of both types of BGP soft resets.
Resetting a Router Using BGP Outbound Soft Reset
Outbound soft resets do not require any preconfiguration. Using the soft keyword specifies that a soft reset be performed. To perform an outbound soft reset, use the following command in EXEC mode:
Configuring BGP Soft Reset Using Stored Routing Policy Information
If all of the BGP routers in the connection do not support the route refresh capability, use the soft reset method that generates a new set of inbound routing table updates from information previously stored. To initiate storage of inbound routing table updates, you must first preconfigure the router using the neighbor soft-reconfiguration router configuration command. The clear ip bgp EXEC command initiates the soft reset, which generates a new set of inbound routing table updates using the stored information.
Remember that the memory requirements for storing the inbound update information can become quite large.To configure BGP soft reset using stored routing policy information, use the following commands beginning in router configuration mode:
See the “BGP Path Filtering by Neighbor Examples” section at the end of this chapter for an example of BGP path filtering by neighbor.
Verifying BGP Soft Reset
To verify whether a soft reset is successful and check information about the routing table and about BGP neighbors, perform the following steps:
Step 1 ![]() Enter the show ip bgp EXEC command to display entries in the BGP routing table. The following output shows that the peer supports the route refresh capability:
Enter the show ip bgp EXEC command to display entries in the BGP routing table. The following output shows that the peer supports the route refresh capability:
Router# show ip bgp
BGP table version is 5, local router ID is 10.0.33.34
Status codes: s suppressed, d damped, h history, * valid, > best, i - internal
Origin codes: i - IGP, e - EGP, ? - incomplete
Network Next Hop Metric LocPrf Weight Path
*> 1.0.0.0 0.0.0.0 0 32768 ?
* 2.0.0.0 10.0.33.35 10 0 35 ?
*> 0.0.0.0 0 32768 ?
* 10.0.0.0 10.0.33.35 10 0 35 ?
*> 0.0.0.0 0 32768 ?
*> 192.168.0.0/16 10.0.33.35 10 0 35 ?
Step 2 ![]() Enter the show ip bgp neighbors EXEC command to display information about the BGP and TCP connections to neighbors:
Enter the show ip bgp neighbors EXEC command to display information about the BGP and TCP connections to neighbors:
Router# show ip bgp neighbors 171.69.232.178
BGP neighbor is 172.16.232.178, remote AS 35, external link
BGP version 4, remote router ID 192.168.3.3
BGP state = Established, up for 1w1d
Last read 00:00:53, hold time is 180, keepalive interval is 60 seconds
Neighbor capabilities:
Route refresh: advertised and received
Address family IPv4 Unicast: advertised and received
Address family IPv4 Multicast: advertised and received
Received 12519 messages, 0 notifications, 0 in queue
Sent 12523 messages, 0 notifications, 0 in queue
Route refresh request: received 0, sent 0
Minimum time between advertisement runs is 30 seconds
For address family: IPv4 Unicast
BGP table version 5, neighbor version 5
Index 1, Offset 0, Mask 0x2
Community attribute sent to this neighbor
Inbound path policy configured
Outbound path policy configured
Route map for incoming advertisements is uni-in
Route map for outgoing advertisements is uni-out
3 accepted prefixes consume 108 bytes
Prefix advertised 6, suppressed 0, withdrawn 0
For address family: IPv4 Multicast
BGP table version 5, neighbor version 5
Index 1, Offset 0, Mask 0x2
Inbound path policy configured
Outbound path policy configured
Route map for incoming advertisements is mul-in
Route map for outgoing advertisements is mul-out
3 accepted prefixes consume 108 bytes
Prefix advertised 6, suppressed 0, withdrawn 0
Connections established 2; dropped 1
Last reset 1w1d, due to Peer closed the session
Connection state is ESTAB, I/O status: 1, unread input bytes: 0
Local host: 172.16.232.178, Local port: 179
Foreign host: 172.16.232.179, Foreign port: 11002
Enqueued packets for retransmit: 0, input: 0 mis-ordered: 0 (0 bytes)
Event Timers (current time is 0x2CF49CF8):
Timer Starts Wakeups Next
Retrans 12518 0 0x0
TimeWait 0 0 0x0
AckHold 12514 12281 0x0
SendWnd 0 0 0x0
KeepAlive 0 0 0x0
GiveUp 0 0 0x0
PmtuAger 0 0 0x0
DeadWait 0 0 0x0
iss: 273358651 snduna: 273596614 sndnxt: 273596614 sndwnd: 15434
irs: 190480283 rcvnxt: 190718186 rcvwnd: 15491 delrcvwnd: 893
SRTT: 300 ms, RTTO: 607 ms, RTV: 3 ms, KRTT: 0 ms
minRTT: 0 ms, maxRTT: 300 ms, ACK hold: 200 ms
Flags: passive open, nagle, gen tcbs
Datagrams (max data segment is 1460 bytes):
Rcvd: 24889 (out of order: 0), with data: 12515, total data bytes: 237921
Sent: 24963 (retransmit: 0), with data: 12518, total data bytes: 237981
Configuring BGP Interactions with IGPs
If your autonomous system will be passing traffic through it from another autonomous system to a third autonomous system, make sure that your autonomous system is consistent about the routes that it advertises. For example, if your BGP were to advertise a route before all routers in your network had learned about the route through your IGP, your autonomous system could receive traffic that some routers cannot yet route. To prevent this condition from occurring, BGP must wait until the IGP has propagated routing information across your autonomous system, thus causing BGP to be synchronized with the IGP. Synchronization is enabled by default.
In some cases, you need not synchronize. If you will not be passing traffic from a different autonomous system through your autonomous system, or if all routers in your autonomous system will be running BGP, you can disable synchronization. Disabling this feature can allow you to carry fewer routes in your IGP and allow BGP to converge more quickly. To disable synchronization, use the following command in router configuration mode:
|
|
|
|---|---|
|
Router(config-router)# no synchronization |
Disables synchronization between BGP and an IGP. |
See the “BGP Path Filtering by Neighbor Examples” section at the end of this chapter for an example of BGP synchronization.
In general, you will not want to redistribute most BGP routes into your IGP. A common design is to redistribute one or two routes and to make them exterior routes in IGRP, or have your BGP speaker generate a default route for your autonomous system. When redistributing from BGP into IGP, only the routes learned using eBGP get redistributed.
In most circumstances, you also will not want to redistribute your IGP into BGP. List the networks in your autonomous system with network router configuration commands and your networks will be advertised. Networks that are listed this way are referred to as local networks and have a BGP origin attribute of “IGP.” They must appear in the main IP routing table and can have any source; for example, they can be directly connected or learned via an IGP. The BGP routing process periodically scans the main IP routing table to detect the presence or absence of local networks, updating the BGP routing table as appropriate.
If you do perform redistribution into BGP, you must be very careful about the routes that can be in your IGP, especially if the routes were redistributed from BGP into the IGP elsewhere. Redistributing routes from BGP into the IGP elsewhere creates a situation where BGP is potentially injecting information into the IGP and then sending such information back into BGP, and vice versa. Incorrectly redistributing routes into BGP can result in the loss of critical information, such as the autonomous system path, that is required for BGP to function properly.
Networks that are redistributed into BGP from the EGP protocol will be given the BGP origin attribute “EGP.” Other networks that are redistributed into BGP will have the BGP origin attribute of “incomplete.” The origin attribute in the Cisco implementation is only used in the path selection process.
Configuring BGP Weights
A weight is a number that you can assign to a path so that you can control the path selection process. The administrative weight is local to the router. A weight can be a number from 0 to 65535. Any path that a Cisco router originates will have a default weight of 32768; other paths have weight 0. If you have particular neighbors that you want to prefer for most of your traffic, you can assign a higher weight to all routes learned from that neighbor.
Weights can be assigned based on autonomous system path access lists. A given weight becomes the weight of the route if the autonomous system path is accepted by the access list. Any number of weight filters are allowed. Weights can only be assigned via route maps.
Disabling Autonomous System Path Comparison
To prevent the router from considering the autonomous system path length when selecting a route, use the following command in router configuration mode:
|
|
|
|---|---|
|
Router(config-router)# bgp bestpath as-path ignore |
Configures the router to ignore autonomous system path length in selecting a route. |
Configuring BGP Route Filtering by Neighbor
You can filter BGP advertisements in two ways:
•![]() Use autonomous system path filters, as with the ip as-path access-list global configuration command and the neighbor filter-list router configuration command
Use autonomous system path filters, as with the ip as-path access-list global configuration command and the neighbor filter-list router configuration command
•![]() Use access or prefix lists, as with the neighbor distribute-list router configuration command.
Use access or prefix lists, as with the neighbor distribute-list router configuration command.
Filtering using prefix lists is described in the “Configuring BGP Filtering Using Prefix Lists” section.
If you want to restrict the routing information that the Cisco IOS software learns or advertises, you can filter BGP routing updates to and from particular neighbors. You can either define an access list or a prefix list and apply it to the updates.
Note ![]() Distribute-list filters are applied to network numbers and not autonomous system paths.
Distribute-list filters are applied to network numbers and not autonomous system paths.
To filter BGP routing updates, use the following command in router configuration mode:
Note ![]() Although the neighbor prefix-list router configuration command can be used as an alternative to the neighbor distribute-list command, do not use attempt to apply both the neighbor prefix-list and neighbor distribute-list command filtering to the same neighbor in any given direction. These two commands are mutually exclusive, and only one command (neighbor prefix-list or neighbor distribute-list) can be applied for each inbound or outbound direction.
Although the neighbor prefix-list router configuration command can be used as an alternative to the neighbor distribute-list command, do not use attempt to apply both the neighbor prefix-list and neighbor distribute-list command filtering to the same neighbor in any given direction. These two commands are mutually exclusive, and only one command (neighbor prefix-list or neighbor distribute-list) can be applied for each inbound or outbound direction.
Configuring BGP Filtering Using Prefix Lists
Prefix lists can be used as an alternative to access lists in many BGP route filtering commands. The section “How the System Filters Traffic by Prefix List” describes the way prefix list filtering works. The advantages of using prefix lists are as follows:
•![]() Significant performance improvement in loading and route lookup of large lists.
Significant performance improvement in loading and route lookup of large lists.
•![]() Support for incremental updates. Filtering using extended access lists does not support incremental updates.
Support for incremental updates. Filtering using extended access lists does not support incremental updates.
•![]() More user-friendly command-line interface (CLI). The command-line interface for using access lists to filter BGP updates is difficult to understand and use because it uses the packet filtering format.
More user-friendly command-line interface (CLI). The command-line interface for using access lists to filter BGP updates is difficult to understand and use because it uses the packet filtering format.
•![]() Greater flexibility
Greater flexibility
Before using a prefix list in a command, you must set up a prefix list, and you may want to assign sequence numbers to the entries in the prefix list.
How the System Filters Traffic by Prefix List
Filtering by prefix list involves matching the prefixes of routes with those listed in the prefix list. When there is a match, the route is used. More specifically, whether a prefix is permitted or denied is based upon the following rules:
•![]() An empty prefix list permits all prefixes.
An empty prefix list permits all prefixes.
•![]() An implicit deny is assumed if a given prefix does not match any entries of a prefix list.
An implicit deny is assumed if a given prefix does not match any entries of a prefix list.
•![]() When multiple entries of a prefix list match a given prefix, the longest, most specific match is chosen.
When multiple entries of a prefix list match a given prefix, the longest, most specific match is chosen.
The router begins the search at the top of the prefix list, with the sequence number 1. Once a match or deny occurs, the router need not go through the rest of the prefix list. For efficiency, you may want to put the most common matches or denies near the top of the list, using the seq argument in the ip prefix-list global configuration command. The show commands always include the sequence numbers in their output.
Sequence numbers are generated automatically unless you disable this automatic generation. If you disable the automatic generation of sequence numbers, you must specify the sequence number for each entry using the sequence-value argument of the ip prefix-list global configuration command.
Regardless of whether the default sequence numbers are used in configuring a prefix list, a sequence number need not be specified when removing a configuration entry.
show commands include the sequence numbers in their output.
Creating a Prefix List
To create a prefix list, use the following command in router configuration mode:
Note ![]() To create a prefix list you must enter at least one permit or deny clause.
To create a prefix list you must enter at least one permit or deny clause.
To remove a prefix list and all of its entries, use the following command in router configuration mode:
Configuring a Prefix List Entry
You can add entries to a prefix list individually. To configure an entry in a prefix list, use the following command in router configuration mode:
The optional ge and le keywords can be used to specify the range of the prefix length to be matched for prefixes that are more specific than the network/length argument. An exact match is assumed when neither ge nor le is specified. The range is assumed to be from ge-value to 32 if only the ge attribute is specified, and from len to le-value if only the le attribute is specified.
A specified ge-value or le-value must satisfy the following condition:
len < ge-value <= le-value <= 32
For example, to deny all prefixes matching /24 in 128.0.0.0/8, use the following command:
ip prefix-list abc deny 128.0.0.0/8 ge 24 le 24
Note ![]() You can specify sequence values for prefix list entries in any increments you want (the automatically generated numbers are incremented in units of 5). If you specify the sequence values in increments of 1, you cannot insert additional entries into the prefix list. If you choose very large increments, you could run out of sequence values.
You can specify sequence values for prefix list entries in any increments you want (the automatically generated numbers are incremented in units of 5). If you specify the sequence values in increments of 1, you cannot insert additional entries into the prefix list. If you choose very large increments, you could run out of sequence values.
Configuring How Sequence Numbers of Prefix List Entries Are Specified
By default, the sequence numbers are automatically generated when you create a prefix list entry. Sequence numbers can be suppressed with the no ip prefix-list sequence-number global configuration command. Sequence values are generated in increments of 5. The first sequence value generated in a prefix list would be 5, then 10, then 15, and so on. If you specify a value for an entry and then do not specify values for subsequent entries, the assigned (generated) sequence values are incremented in units of five. For example, if you specify that the first entry in the prefix list has a sequence value of 3, and then do not specify sequence values for the other entries, the automatically generated numbers will be 8, 13, 18, and so on.
To disable the automatic generation of sequence numbers, use the following command in router configuration mode:
|
|
|
|---|---|
|
Router(config-router)# no ip prefix-list sequence-number |
Disables the automatic generation of the sequence numbers for prefix list entries. |
To re-enable automatic generation of the sequence numbers of prefix list entries, use the ip prefix-list sequence number command in router configuration mode:
|
|
|
|---|---|
|
Router(config-router)# ip prefix-list sequence-number |
Enables the automatic generation of the sequence numbers of prefix list entries. The default is enable. |
If you disable automatic generation of sequence numbers in a prefix list, you must specify the sequence number for each entry using the sequence-value argument of the ip prefix-list global configuration command.
Regardless of whether the default sequence numbers are used in configuring a prefix list, a sequence number need not be specified when deconfiguring an entry. show commands include the sequence numbers in their output.
Deleting a Prefix List or Prefix List Entries
To delete a prefix list, use the following command in router configuration mode:
|
|
|
|
Router(config-router)# no ip prefix-list list-name |
Deletes a prefix list. |
You can delete entries from a prefix list individually. To delete an entry in a prefix list, use the following command in router configuration mode:
|
|
|
|---|---|
|
Router(config-router)# no ip prefix-list seq sequence-value |
Deletes an entry in a prefix list. |
Note ![]() The sequence number of an entry need not be specified when you delete the entry.
The sequence number of an entry need not be specified when you delete the entry.
Displaying Prefix Entries
To display information about prefix tables, prefix table entries, the policy associated with a node, or specific information about an entry, use the following commands in EXEC mode as needed:
Clearing the Hit Count Table of Prefix List Entries
To clear the hit count table of prefix list entries, use the following command in EXEC mode:
|
|
|
|
Router# clear ip prefix-list prefix-list-name[network/length] |
Clears the hit count table of the prefix list entries. |
Configuring BGP Path Filtering by Neighbor
In addition to filtering routing updates based on network numbers, you can specify an access list filter on both incoming and outbound updates based on the BGP autonomous system paths. Each filter is an access list based on regular expressions. To specify the access list filter, define an autonomous system path access list and apply it to updates to and from particular neighbors. See the “Regular Expressions” appendix in the Cisco IOS Terminal Services Configuration Guide for more information on forming regular expressions.
To configure BGP path filtering, use the following commands beginning in global configuration mode:
See the “BGP Path Filtering by Neighbor Examples” section at the end of this chapter for an example of BGP path filtering by neighbor.
Disabling Next Hop Processing on BGP Updates
You can configure the Cisco IOS software to disable next hop processing for BGP updates to a neighbor. Disabling next hop processing might be useful in nonmeshed networks such as Frame Relay or X.25, where BGP neighbors might not have direct access to all other neighbors on the same IP subnet. There are two ways to disable next hop processing:
•![]() Provide a specific address to be used instead of the next hop address (manually configuring each address).
Provide a specific address to be used instead of the next hop address (manually configuring each address).
•![]() Use a route map to specify that the address of the remote peer for matching inbound routes, or the local router for matching outbound routes (automatic method).
Use a route map to specify that the address of the remote peer for matching inbound routes, or the local router for matching outbound routes (automatic method).
Disabling Next Hop Processing Using a Specific Address
To disable next hop processing and provide a specific address to be used instead of the next hop address, use the following command in router configuration mode:
|
|
|
|---|---|
|
Router(config-router)# neighbor {ip-address | peer-group-name} next-hop-self |
Disables next hop processing on BGP updates to a neighbor. |
Configuring this command causes the current router to advertise its peering address as the next hop for the specified neighbor. Therefore, other BGP neighbors will forward to it packets for that address. This configuration is useful in a nonmeshed environment because you know that a path exists from the present router to that address. In a fully meshed environment, this configuration is not useful because it will result in unnecessary extra hops and because there might be a direct access through the fully meshed cloud with fewer hops.
Disabling Next Hop Processing Using a Route Map
To override the inbound next hop setting for BGP routes and specify that the next hop of the matching routes is to be the IP address of the remote peer, or to set the peering address of the local router to be the next hop of the matching routes, use the neighbor next-hop-self router configuration command.
To configure the neighbor peering address to be used for the next hop address, use the following command in route map configuration mode:
Configuring BGP Next Hop Propagation
The BGP Next Hop Propagation feature provides additional flexibility when designing and migrating networks. The BGP Next Hop Propagation feature allows a route reflector to modify the next hop attribute for a reflected route and allows BGP to send an update to an eBGP multihop peer with the next hop attribute unchanged.

The configuration of this feature in conjunction with the iBGP Multipath Load Sharing feature allows you to use an outbound route map to include BGP route reflectors in the forwarding path.
The BGP Next Hop Propagation feature allows you to perform the following tasks:
•![]() Bring the route reflector into the forwarding path, which can be used with the iBGP Multipath Load Sharing feature to configure load balancing.
Bring the route reflector into the forwarding path, which can be used with the iBGP Multipath Load Sharing feature to configure load balancing.
•![]() Configure interprovider Multiprotocol Label Switching (MPLS) Virtual Private Networks (VPNs) by not modifying the next hop attribute when advertising routes to an eBGP peer.
Configure interprovider Multiprotocol Label Switching (MPLS) Virtual Private Networks (VPNs) by not modifying the next hop attribute when advertising routes to an eBGP peer.
•![]() Turn off the next hop calculation for an eBGP peer. This feature is useful for configuring the end-to-end connection of a label-switched path.
Turn off the next hop calculation for an eBGP peer. This feature is useful for configuring the end-to-end connection of a label-switched path.
To configure an eBGP multihop peer to propagate the next hop unchanged, use the following command in router configuration mode:
Configuring the BGP Version
By default, BGP sessions begin using BGP Version 4 and negotiating downward to earlier versions if necessary. To prevent negotiation and force the BGP version used to communicate with a neighbor, use the following command in router configuration mode:
|
|
|
|
Router(config-router)# neighbor {ip-address | peer-group-name} version number |
Specifies the BGP version to use when communicating with a neighbor. |
Configuring the MED Metric
BGP uses the MED metric as a hint to external neighbors about preferred paths. (The name of this metric for BGP Versions 2 and 3 is INTER_AS_METRIC.) To set the MED of the redistributed routes, Use the following command in router configuration mode. All the routes without a MED will also be set to this value.
|
|
|
|---|---|
|
Router(config-router)# default-metric number |
Sets an MED. |
Alternatively, you can set the MED using the route-map router configuration command. See the “BGP Route Map Examples” section at the end of this chapter for examples of using BGP route maps.
Configuring Advanced BGP Features
The tasks in this section are for configuring advanced BGP features.
Using Route Maps to Modify Updates
You can use a route map on a per-neighbor basis to filter updates and modify various attributes. A route map can be applied to either inbound or outbound updates. Only the routes that pass the route map are sent or accepted in updates.
On both the inbound and the outbound updates, we support matching based on autonomous system path, community, and network numbers. Autonomous system path matching requires the as-path access-list global configuration command, community based matching requires the ip community-list global configuration command and network-based matching requires the ip access-list global configuration command. To apply a route map to incoming and outgoing routes, use the following command in router configuration mode:
|
|
|
|---|---|
|
Router(config-router)# neighbor {ip-address | peer-group-name} route-map map-name {in | out} |
Applies a route map to incoming or outgoing routes. |
See the “BGP Route Map Examples” section at the end of this chapter for BGP route map examples.
Resetting eBGP Connections Immediately upon Link Failure
Normally, when a link between external neighbors goes down, the BGP session will not be reset immediately.To reset the eBGP session as soon as an interface goes down, use the following command in router configuration mode:
|
|
|
|
Router(config-router)# bgp fast-external-fallover |
Resets eBGP sessions automatically. |
Configuring Aggregate Addresses
CIDR enables you to create aggregate routes (or supernets) to minimize the size of routing tables. You can configure aggregate routes in BGP either by redistributing an aggregate route into BGP or by using the BGP Conditional Aggregation feature. An aggregate address will be added to the BGP table if at least one more specific entry is in the BGP table.
To create an aggregate address in the routing table, use the following commands in router configuration mode:
See the “BGP Aggregate Route Examples” section at the end of this chapter for examples of using BGP aggregate routes.
Disabling Automatic Summarization of Network Numbers
In BGP Version 3, when a subnet is redistributed from an IGP into BGP, only the network route is injected into the BGP table. By default, this automatic summarization is enabled. To disable automatic network number summarization, use the following command in router configuration mode:
|
|
|
|---|---|
|
Router(config-router)# no auto-summary |
Disables automatic network summarization. |
Configuring BGP Community Filtering
BGP supports transit policies via controlled distribution of routing information. The distribution of routing information is based on one of the following three values:
•![]() IP address (see the “Configuring BGP Route Filtering by Neighbor” section earlier in this chapter).
IP address (see the “Configuring BGP Route Filtering by Neighbor” section earlier in this chapter).
•![]() The value of the autonomous system path attribute (see the “Configuring BGP Path Filtering by Neighbor” section earlier in this chapter).
The value of the autonomous system path attribute (see the “Configuring BGP Path Filtering by Neighbor” section earlier in this chapter).
•![]() The value of the communities attribute (as described in this section).
The value of the communities attribute (as described in this section).
The communities attribute is a way to group destinations into communities and apply routing decisions based on the communities. This method simplifies the configuration of a BGP speaker that controls distribution of routing information.
A community is a group of destinations that share some common attribute. Each destination can belong to multiple communities. Autonomous system administrators can define to which communities a destination belongs. By default, all destinations belong to the general Internet community. The community is carried as the communities attribute.
The communities attribute is an optional, transitive, global attribute in the numerical range from 1 to 4,294,967,200. Along with Internet community, there are a few predefined, well-known communities, as follows:
•![]() internet—Advertise this route to the Internet community. All routers belong to it.
internet—Advertise this route to the Internet community. All routers belong to it.
•![]() no-export—Do not advertise this route to eBGP peers.
no-export—Do not advertise this route to eBGP peers.
•![]() no-advertise—Do not advertise this route to any peer (internal or external).
no-advertise—Do not advertise this route to any peer (internal or external).
•![]() local-as—Do not advertise this route to peers outside the local autonomous system. This route will not be advertised to other autonomous systems or sub-autonomous systems when confederations are configured.
local-as—Do not advertise this route to peers outside the local autonomous system. This route will not be advertised to other autonomous systems or sub-autonomous systems when confederations are configured.
Based on the community, you can control which routing information to accept, prefer, or distribute to other neighbors. A BGP speaker can set, append, or modify the community of a route when you learn, advertise, or redistribute routes. When routes are aggregated, the resulting aggregate has a communities attribute that contains all communities from all the initial routes.
You can use community lists to create groups of communities to use in a match clause of a route map. Just like an access list, a series of community lists can be created. Statements are checked until a match is found. As soon as one statement is satisfied, the test is concluded.
To create a community list, use the following command in global configuration mode:
|
|
|
|---|---|
|
Router(config)# ip community-list community-list-number {permit | deny} community-number |
Creates a community list. |
To set the communities attribute and match clauses based on communities, see the match community-listand set community route map configuration commands in the “Redistribute Routing Information” section in the “Configuring IP Routing Protocol-Independent Features” chapter.
By default, no communities attribute is sent to a neighbor. To specify that the communities attribute to be sent to the neighbor at an IP address, use the following command in router configuration mode:
To remove communities from the community attribute of an inbound or outbound update using a route map to filter and determine the communities to be deleted, use the following command in router configuration mode:
|
|
|
|---|---|
|
Router(config-router)# set comm-listcommunity-list-number delete |
Removes communities in a community attribute that match a standard or extended community list. |
Specifying the Format for the Community
A BGP community is displayed in a two-part format 2 bytes long in the show ip bgp community EXEC command output, and wherever communities are displayed in the router configuration, such as router maps and community lists. In the most recent version of the RFC for BGP, a community is of the form AA:NN, where the first part is the autonomous system number and the second part is a 2-byte number. The Cisco default community format is in the format NNAA.
To display BGP communities in the new format, use the following command in global configuration mode:
|
|
|
|---|---|
|
Router(config)# ip bgp-community new-format |
Displays and parses BGP communities in the format AA:NN. |
Configuring BGP Conditional Advertisement
BGP advertises routes from its routing table to external peers (peers in different autonomous systems) by default. The BGP Conditional Advertisement feature provides additional control of route advertisement depending on the existence of other prefixes in the BGP table. Normally, routes are propagated regardless of the existence of a different path. The BGP Conditional Advertisement feature uses the non-exist-map and the advertise-map to track routes by the route prefix. If a route prefix is not present in the non-exist-map, the route specified by the advertise-map is announced. The announced route is installed to the BGP routing table as a locally originated route and will behave as a locally originated route. The announced route will be originated by BGP only if the corresponding route exists in the BGP table. After the prefix is locally originated by BGP, BGP will advertise the prefix to internal and external peers. If the route prefix is present, the route in the advertise-map is not announced.
Conditional advertisement can be useful in a multihomed network, in which some prefixes are to be advertised to one of the providers, only if information from the other provider is missing. This condition would indicate a failure in the peering session, or partial reachability.
If the same information is advertised to all providers in a multihomed environment, the information is duplicated in the global BGP table. When the BGP Conditional Advertisement feature is used, only partial routes are advertised to each provider, and the size of the global BGP table is not increased with redundant information. The administrator can also guarantee the path that inbound traffic will follow because only specific paths are advertised to providers.
Note ![]() The conditional BGP announcements are sent in addition to the normal announcements that a BGP router sends to its peers.
The conditional BGP announcements are sent in addition to the normal announcements that a BGP router sends to its peers.
Note ![]() Autonomous system path list information cannot be used for conditional advertisement because the IP routing table does not contain autonomous system path information.
Autonomous system path list information cannot be used for conditional advertisement because the IP routing table does not contain autonomous system path information.
BGP Conditional Advertisement Configuration Task List
See the following section for configuration tasks for the BGP Conditional Advertisement feature. Each task in the list indicates if the task is optional or required.
•![]() Configure the route-maps that will be used in conjunction with the advertise-map and the non-exist-map. This step may include the configuration of access-lists or prefix-lists. (Required)
Configure the route-maps that will be used in conjunction with the advertise-map and the non-exist-map. This step may include the configuration of access-lists or prefix-lists. (Required)
•![]() Configure the router to run BGP. (Required)
Configure the router to run BGP. (Required)
•![]() Configure the advertise-map and the non-exist-map with the neighbor advertise-map non-exist-maprouter configuration command. (Required)
Configure the advertise-map and the non-exist-map with the neighbor advertise-map non-exist-maprouter configuration command. (Required)
•![]() Verify that the BGP Condition Advertisement feature has been configured with the show ip bgp neighborcommand. (Optional)
Verify that the BGP Condition Advertisement feature has been configured with the show ip bgp neighborcommand. (Optional)
Conditional Advertisement of a Set of Routes
To conditionally advertise a set of routes, use the following commands beginning in router configuration mode:
See the “BGP Conditional Advertisement Configuration Examples” section at the end of this chapter for an example configuration of BGP conditional advertisement.
Verifying BGP Conditional Advertisement
To verify that the BGP Condition Advertisement feature has been configured, use the show ip bgp neighborcommand. The show ip bgp neighbor EXEC command will show the status of the BGP Conditional Advertisement feature as initialized or uninitialized. The following example shows output from the show ip bgp neighbor EXEC command:
router# show ip bgp neigbor 172.16.1.1
BGP neighbor is 172.16.1.1, remote AS 65200, internal link
Description:link to boston as 65200
BGP version 4, remote router ID 10.1.1.1
BGP state = Established, up for 01:04:30
Last read 00:00:30, hold time is 180, keepalive interval is 60 seconds
Neighbor capabilities:
Route refresh:advertised and received
Address family IPv4 Unicast:advertised and received
Received 83 messages, 0 notifications, 0 in queue
Sent 78 messages, 0 notifications, 0 in queue
Route refresh request:received 0, sent 0
Minimum time between advertisement runs is 5 seconds
For address family:IPv4 Unicast
BGP table version 18, neighbor version 18
Index 2, Offset 0, Mask 0x4
Inbound soft reconfiguration allowed
NEXT_HOP is always this router
Community attribute sent to this neighbor
Condition-map old-route, Advertise-map new-route, status:Uninitialized
2 accepted prefixes consume 72 bytes
Prefix advertised 7, suppressed 0, withdrawn 4
Connections established 1; dropped 0
Last reset 01:05:29, due to Soft reconfig change
BGP Conditional Advertisement Troubleshooting Tips
This section provides troubleshooting information for the BGP conditional advertisement feature.
The BGP Conditional Advertisement feature is based on the nonexistence of a prefix and the advertisement of another. Normally, only two problems can occur:
•![]() The tracked prefix exists, but the conditional advertisement occurs.
The tracked prefix exists, but the conditional advertisement occurs.
•![]() The tracked prefix does not exist, and the conditional advertisement does not occur.
The tracked prefix does not exist, and the conditional advertisement does not occur.
The same method of troubleshooting is used for both problems:
•![]() Verify the existence (or not) of the tracked prefix in the BGP table with the show ip bgp EXEC command.
Verify the existence (or not) of the tracked prefix in the BGP table with the show ip bgp EXEC command.
•![]() Verify the advertisement (or not) of the other prefix using the show ip bgp neighbor advertised-routes EXEC command.
Verify the advertisement (or not) of the other prefix using the show ip bgp neighbor advertised-routes EXEC command.
The user needs to ensure that all of the characteristics specified in the route maps match the routes in the BGP table.
Configuring a Routing Domain Confederation
One way to reduce the iBGP mesh is to divide an autonomous system into multiple subautonomous systems and group them into a single confederation. To the outside world, the confederation looks like a single autonomous system. Each autonomous system is fully meshed within itself, and has a few connections to other autonomous systems in the same confederation. Even though the peers in different autonomous systems have eBGP sessions, they exchange routing information as if they were iBGP peers. Specifically, the next hop, MED, and local preference information is preserved. This feature allows the you to retain a single IGP for all of the autonomous systems.
To configure a BGP confederation, you must specify a confederation identifier. To the outside world, the group of autonomous systems will look like a single autonomous system with the confederation identifier as the autonomous system number. To configure a BGP confederation identifier, use the following command in router configuration mode:
|
|
|
|---|---|
|
Router(config-router)# bgp confederation identifier as-number |
Configures a BGP confederation. |
In order to treat the neighbors from other autonomous systems within the confederation as special eBGP peers, use the following command in router configuration mode:
|
|
|
|---|---|
|
Router(config-router)# bgp confederation peersas-number [as-number] |
Specifies the autonomous systems that belong to the confederation. |
See the “BGP Community with Route Maps Examples” section at the end of this chapter for an example configuration of several peers in a confederation.
For an alternative way to reduce the iBGP mesh, see the next section, “Configuring a Route Reflector.”
Configuring a Route Reflector
BGP requires that all iBGP speakers be fully meshed. However, this requirement does not scale well when there are many iBGP speakers. Instead of configuring a confederation, another way to reduce the iBGP mesh is to configure a route reflector.
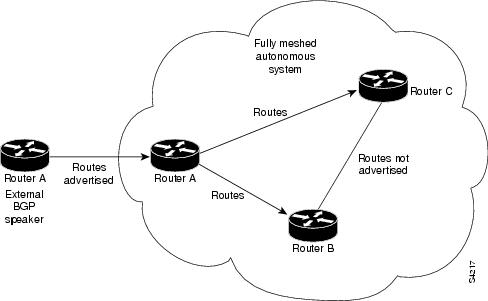
Figure 55 illustrates a simple iBGP configuration with three iBGP speakers (Routers A, B, and C). Without route reflectors, when Router A receives a route from an external neighbor, it must advertise it to both routers B and C. Routers B and C do not readvertise the iBGP learned route to other iBGP speakers because the routers do not pass on routes learned from internal neighbors to other internal neighbors, thus preventing a routing information loop.
Figure 55 Three Fully Meshed iBGP Speakers
With route reflectors, all iBGP speakers need not be fully meshed because there is a method to pass learned routes to neighbors. In this model, an iBGP peer is configured to be a route reflector responsible for passing iBGP learned routes to a set of iBGP neighbors. In Figure 56, Router B is configured as a route reflector. When the route reflector receives routes advertised from Router A, it advertises them to Router C, and vice versa. This scheme eliminates the need for the iBGP session between Routers A and C.
Figure 56 Simple BGP Model with a Route Reflector

The internal peers of the route reflector are divided into two groups: client peers and all the other routers in the autonomous system (nonclient peers). A route reflector reflects routes between these two groups. The route reflector and its client peers form a cluster. The nonclient peers must be fully meshed with each other, but the client peers need not be fully meshed. The clients in the cluster do not communicate with iBGP speakers outside their cluster.
Figure 57 More Complex BGP Route Reflector Model
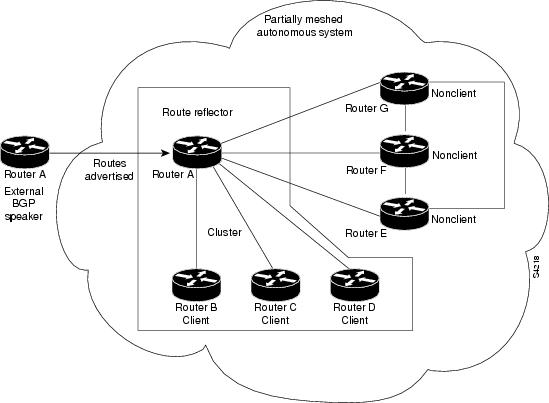
Figure 57 illustrates a more complex route reflector scheme. Router A is the route reflector in a cluster with routers B, C, and D. Routers E, F, and G are fully meshed, nonclient routers.
When the route reflector receives an advertised route, depending on the neighbor, it takes the following actions:
•![]() A route from an external BGP speaker is advertised to all clients and nonclient peers.
A route from an external BGP speaker is advertised to all clients and nonclient peers.
•![]() A route from a nonclient peer is advertised to all clients.
A route from a nonclient peer is advertised to all clients.
•![]() A route from a client is advertised to all clients and nonclient peers. Hence, the clients need not be fully meshed.
A route from a client is advertised to all clients and nonclient peers. Hence, the clients need not be fully meshed.
To configure a route reflector and its clients, use the following command in router configuration mode:
|
|
|
|---|---|
|
Router(config-router)# neighbor ip-address | peer-group-name route-reflector-client |
Configures the local router as a BGP route reflector and the specified neighbor as a client. |
Along with route reflector-aware BGP speakers, it is possible to have BGP speakers that do not understand the concept of route reflectors. They can be members of either client or nonclient groups allowing a easy and gradual migration from the old BGP model to the route reflector model. Initially, you could create a single cluster with a route reflector and a few clients. All the other iBGP speakers could be nonclient peers to the route reflector and then more clusters could be created gradually.
An autonomous system can have multiple route reflectors. A route reflector treats other route reflectors just like other iBGP speakers. A route reflector can be configured to have other route reflectors in a client group or nonclient group. In a simple configuration, the backbone could be divided into many clusters. Each route reflector would be configured with other route reflectors as nonclient peers (thus, all the route reflectors will be fully meshed). The clients are configured to maintain iBGP sessions with only the route reflector in their cluster.
Usually a cluster of clients will have a single route reflector. In that case, the cluster is identified by the router ID of the route reflector. To increase redundancy and avoid a single point of failure, a cluster might have more than one route reflector. In this case, all route reflectors in the cluster must be configured with the 4-byte cluster ID so that a route reflector can recognize updates from route reflectors in the same cluster. All the route reflectors serving a cluster should be fully meshed and all of them should have identical sets of client and nonclient peers.
If the cluster has more than one route reflector, configure the cluster ID by using the following command in router configuration mode:
|
|
|
|---|---|
|
Router(config-router)# bgp cluster-id cluster-id |
Configures the cluster ID. |
Use the show ip bgp EXEC command to display the originator ID and the cluster-list attributes.
By default, the clients of a route reflector are not required to be fully meshed and the routes from a client are reflected to other clients. However, if the clients are fully meshed, the route reflector need not reflect routes to clients.
To disable client-to-client route reflection, use the no bgp client-to-client reflection command in router configuration mode:
|
|
|
|---|---|
|
Router(config-router)# no bgp client-to-client reflection |
Disables client-to-client route reflection. |
As the iBGP learned routes are reflected, routing information may loop. The route reflector model has the following mechanisms to avoid routing loops:
•![]() Originator ID is an optional, nontransitive BGP attribute. It is a 4-byte attributed created by a route reflector. The attribute carries the router ID of the originator of the route in the local autonomous system. Therefore, if a misconfiguration causes routing information to come back to the originator, the information is ignored.
Originator ID is an optional, nontransitive BGP attribute. It is a 4-byte attributed created by a route reflector. The attribute carries the router ID of the originator of the route in the local autonomous system. Therefore, if a misconfiguration causes routing information to come back to the originator, the information is ignored.
•![]() Cluster-list is an optional, nontransitive BGP attribute. It is a sequence of cluster IDs that the route has passed. When a route reflector reflects a route from its clients to nonclient peers, and vice versa, it appends the local cluster ID to the cluster-list. If the cluster-list is empty, a new cluster-list is created. Using this attribute, a route reflector can identify if routing information is looped back to the same cluster due to misconfiguration. If the local cluster ID is found in the cluster-list, the advertisement is ignored.
Cluster-list is an optional, nontransitive BGP attribute. It is a sequence of cluster IDs that the route has passed. When a route reflector reflects a route from its clients to nonclient peers, and vice versa, it appends the local cluster ID to the cluster-list. If the cluster-list is empty, a new cluster-list is created. Using this attribute, a route reflector can identify if routing information is looped back to the same cluster due to misconfiguration. If the local cluster ID is found in the cluster-list, the advertisement is ignored.
•![]() Use set clauses in outbound route maps to modify attributes, possibly creating routing loops. To avoid this behavior, set clauses of outbound route maps are ignored for routes reflected to iBGP peers.
Use set clauses in outbound route maps to modify attributes, possibly creating routing loops. To avoid this behavior, set clauses of outbound route maps are ignored for routes reflected to iBGP peers.
Configuring BGP Peer Groups
Often, in a BGP speaker, many neighbors are configured with the same update policies (that is, the same outbound route maps, distribute lists, filter lists, update source, and so on). Neighbors with the same update policies can be grouped into peer groups to simplify configuration and, more importantly, to make updating more efficient. When you have many peers, this approach is highly recommended.
The three steps to configure a BGP peer group, described in the following sections, are as follows:
2. ![]() Assigning Options to the Peer Group
Assigning Options to the Peer Group
3. ![]() Making Neighbors Members of the Peer Group
Making Neighbors Members of the Peer Group
You can disable a BGP peer or peer group without removing all the configuration information using the neighbor shutdown router configuration command.
Creating the Peer Group
To create a BGP peer group, use the following command in router configuration mode:
|
|
|
|---|---|
|
Router(config-router)# neighbor peer-group-name peer-group |
Creates a BGP peer group. |
Assigning Options to the Peer Group
After you create a peer group, you configure the peer group with neighbor commands. By default, members of the peer group inherit all the configuration options of the peer group. Members can also be configured to override the options that do not affect outbound updates.
Peer group members will always inherit the following attributes: minimum-advertisement-interval, next-hop-self, out-route-map, out-filter-list, out-dist-list, remote-as (if configured), version, and update-source. All the peer group members will inherit changes made to the peer group.
To assign configuration options to an individual neighbor, specify any of the following commands using the IP address. To assign the options to a peer group, specify any of the commands using the peer group name. Use the following commands in router configuration mode as needed.
Router(config-router)# neighbor {ip-address | peer-group-name} route-map map-name {in | out}
Applies a route map to incoming or outgoing routes.
Router(config-router)# neighbor {ip-address | peer-group-name} soft-reconfiguration inbound
Configures the software to start storing received updates.
This command requires at least one keyword. Currently the only keyword available is inbound, so the use of inbound is not optional.
If a peer group is not configured with a remote-as attribute, the members can be configured with the neighbor remote-as router configuration command. This command allows you to create peer groups containing eBGP neighbors.
You can customize inbound policies for peer group members (using, for example, a distribute list, route map, or filter list) because one identical copy of an update is sent to every member of a group. Therefore, neighbor options related to outgoing updates cannot be customized for peer group members.
External BGP peers normally must reside on a directly connected network. Sometimes it is useful to relax this restriction in order to test BGP; do so by specifying the neighbor ebgp-multihop router configuration command.
Note ![]() To avoid the accidental creation of loops through oscillating routes, the multihop session will not be established if the only route to the address of the multihop peer is the default route (0.0.0.0).
To avoid the accidental creation of loops through oscillating routes, the multihop session will not be established if the only route to the address of the multihop peer is the default route (0.0.0.0).
Members of a peer group can pass routes from one member of the peer group to another. For example, if router B is peering with routers A and C, router B can pass routes from router A to router C.
For iBGP, you might want to allow your BGP connections to stay up regardless of which interface is used to reach a neighbor. To enable this configuration, you first configure a loopback interface and assign it an IP address. Next, configure the BGP update source to be the loopback interface. Finally, configure your neighbor to use the address on the loopback interface. Now the iBGP session will be up as long as there is a route, regardless of any interface.
You can set the minimum interval of time between BGP routing updates.
Configuring MD5 Authentication for BGP Peering Sessions
You can configure MD5 authentication between two BGP peers, meaning that each segment sent on the TCP connection between the peers is verified. MD5 authentication must be configured with the same password on both BGP peers; otherwise, the connection between them will not be made. Configuring MD5 authentication causes the Cisco IOS software to generate and check the MD5 digest of every segment sent on the TCP connection. If authentication is invoked and a segment fails authentication, then an error message will be displayed in the console.
When configuring MD5 authentication, you can enter a case-sensitive password of up to 25 characters. The string can contain any alphanumeric characters, including spaces. A password cannot be configured in the number-space-anything format. The space after the number can cause authentication to fail. You can also use any combination of the following symbolic characters along with alphanumeric characters:
` ~ ! @ # $ % ^ & * ( ) – _ = + | \ } ] { [ ” ` : ; / > < . , ?
Old Behavior
In previous versions of Cisco IOS software, configuring MD5 authentication for a BGP peering session was generally considered to be difficult because the initial configuration and any subsequent MD5 configuration changes required the BGP neighbor to be reset.
New Behavior
This behavior has been changed in current versions of Cisco IOS software. CSCdx23494 introduced a change to MD5 authentication for BGP peering sessions. The BGP peering session does not need to be reset to maintain or establish the peering session for initial configuration or after the MD5 configuration has been changed. However, the configuration must be completed on both the local and remote BGP peer before the BGP hold timer expires. If the hold down timer expires before the MD5 configuration has been completed on both BGP peers, the BGP session will time out.
When the password has been configured, the MD5 key is applied to the TCP session immediately. If one peer is configured before the other, the TCP segments will be discarded on both the local and remote peers due to an authentication failure. The peer that is configured with the password will print an error message in the console similar to the following:
00:03:07: %TCP-6-BADAUTH: No MD5 digest from 10.0.0.2(179) to 10.0.0.1(11000)
The time period in which the password must changed is typically the life time of a stale BGP session. When the password or MD5 key is configured, incoming tcp segments will only be accepted if the key is known. If the key is unknown on both the remote and local peer, the TCP segments will be dropped, and the BGP session will time out when the holddown timer expires.
If the BGP session has been preconfigured with a hold time of 0 seconds, no keepalive messages will be sent. The BGP session will stay up until one of the peers, on either side, tries to transmit a message (For example, a prefix update).
Note ![]() Configuring a new timer value for the holddown timer will only take effect after the session has been reset. So, it is not possible to change the configuration of the holddown timer to avoid resetting the BGP session.
Configuring a new timer value for the holddown timer will only take effect after the session has been reset. So, it is not possible to change the configuration of the holddown timer to avoid resetting the BGP session.
See the “BGP Peer Group Examples” at the end of this chapter for an example of enabling MD5 authentication.
BGP through PIX Firewalls
When configuring BGP peers with MD5 authentication that pass through a PIX firewall you must also disable the TCP random sequence number feature on the PIX firewall because this feature will prevent the BGP peers from successfully negotiating a connection. The BGP neighbor authentication fails because the PIX firewall changes the TCP sequence number for IP packets before it forwards them. When the BGP peer receiving the authentication request runs the MD5 algorithm it will detect that the TCP sequence number has been changed and reject the authentication request. To prevent the TCP sequence number change, use the nonrandomseq keyword in the PIX configuration for the static route configured to allow the BGP connection through the firewall. The non random sequence feature on the PIX firewall prevents the PIX firewall software from changing the sequence number.
Here is an example of the static command configuration on the PIX with the nonrandomseq keyword:
static (inside, outside) 10.0.0.0 10.0.0.0 netmask 255.0.0.0 norandomseq
Making Neighbors Members of the Peer Group
To configure a BGP neighbor to be a member of a BGP peer group, use the following command in router configuration mode, using the same peer group name:
|
|
|
|---|---|
|
Router(config-router)# neighbor ip-address peer-grouppeer-group-name |
Makes a BGP neighbor a member of the peer group. |
See the “BGP Peer Group Examples” section at the end of this chapter for examples of iBGP and eBGP peer groups.
Disabling a Peer or Peer Group
To disable an existing BGP neighbor or neighbor peer group, use the following command in router configuration mode:
|
|
|
|---|---|
|
Router(config-router)# neighbor {ip-address | peer-group-name} shutdown |
Shuts down or disables a BGP neighbor or peer group. |
To enable a previously existing neighbor or neighbor peer group that had been disabled using the neighbor shutdown router configuration command, use the following command in router configuration mode:
|
|
|
|---|---|
|
Router(config-router)# no neighbor {ip-address | peer-group-name} shutdown |
Enables a BGP neighbor or peer group. |
Indicating Backdoor Routes
You can indicate which networks are reachable by using a backdoor route that the border router should use. A backdoor network is treated as a local network, except that it is not advertised. To configure backdoor routes, use the network backdoor command, beginning in router configuration mode:
|
|
|
|---|---|
|
Router(config-router)# network ip-addressbackdoor |
Indicates reachable networks through backdoor routes. |
Modifying Parameters While Updating the IP Routing Table
By default, when a BGP route is put into the IP routing table, the MED is converted to an IP route metric, the BGP next hop is used as the next hop for the IP route, and the tag is not set. However, you can use a route map to perform mapping. To modify metric and tag information when the IP routing table is updated with BGP learned routes, use the following command in router configuration mode:
|
|
|
|---|---|
|
Router(config-router)# table-map map-name |
Applies a route map to routes when updating the IP routing table. |
Setting Administrative Distance
Administrative distance is a measure of the preference of different routing protocols. BGP uses three different administrative distances: external, internal, and local. Routes learned through external BGP are given the external distance, routes learned with iBGP are given the internal distance, and routes that are part of this autonomous system are given the local distance. To assign a BGP administrative distance, use the following command in router configuration mode:
|
|
|
|---|---|
|
Router(config-router)# distance bgp external-distance internal-distance local-distance |
Assigns a BGP administrative distance. |
Changing the administrative distance of BGP routes is considered dangerous and generally is not recommended. The external distance should be lower than any other dynamic routing protocol, and the internal and local distances should be higher than any other dynamic routing protocol.
Adjusting BGP Timers
BGP uses certain timers to control periodic activities such as the sending of keepalive messages and the interval after not receiving a keepalive message after which the Cisco IOS software declares a peer dead. By default, the keepalive timer is 60 seconds, and the hold-time timer is 180 seconds.You can adjust these timers. When a connection is started, BGP will negotiate the hold time with the neighbor. The smaller of the two hold times will be chosen. The keepalive timer is then set based on the negotiated hold time and the configured keepalive time.
To adjust BGP timers for all neighbors, use the following command in router configuration mode:
|
|
|
|---|---|
|
Router(config-router)# timers bgp keepalive holdtime |
Adjusts BGP timers for all neighbors. |
To adjust BTP keepalive and hold-time timers for a specific neighbor, use the following command in router configuration mode:
|
|
|
|---|---|
|
Router(config-router)# neighbor [ip-address |peer-group-name] timers keepalive holdtime |
Sets the keepalive and hold-time timers (in seconds) for the specified peer or peer group. |
Note ![]() The timers configured for a specific neighbor or peer group override the timers configured for all BGP neighbors using the timers bgp router configuration command.
The timers configured for a specific neighbor or peer group override the timers configured for all BGP neighbors using the timers bgp router configuration command.
To clear the timers for a BGP neighbor or peer group, use the no form of the neighbor timers command.
Changing the Default Local Preference Value
You can define a particular path as more preferable or less preferable than other paths by changing the default local preference value of 100. To assign a different default local preference value, use the following command in router configuration mode:
|
|
|
|---|---|
|
Router(config-router)# bgp default local-preferencevalue |
Changes the default local preference value. |
You can use route maps to change the default local preference of specific paths. See the “BGP Route Map Examples” section at the end of this chapter for examples when used with BGP route maps.
Redistributing Network 0.0.0.0
By default, you are not allowed to redistribute network 0.0.0.0. To permit the redistribution of network 0.0.0.0, use the following command in router configuration mode:
|
|
|
|---|---|
|
Router(config-router)# default-information originate |
Allows the redistribution of network 0.0.0.0 into BGP. |
Configuring the Router to Consider a Missing MED as Worst Path
To configure the router to consider a path with a missing MED attribute as the worst path, use the following command in router configuration mode:
Selecting Path Based on MEDs from Other Autonomous Systems
The MED is one of the parameters that is considered when selecting the best path among many alternative paths. The path with a lower MED is preferred over a path with a higher MED.
By default, during the best path selection process, MED comparison is done only among paths from the same autonomous system. You can allow comparison of MEDs among paths regardless of the autonomous system from which the paths are received. To do so, use the following command in router configuration mode:
|
|
|
|---|---|
|
Router(config-router)# bgp always-compare-med |
Allows the comparison of MEDs for paths from neighbors in different autonomous systems. |
Configuring the Router to Use the MED to Choose a Path from Subautonomous System Paths
To configure the router to consider the MED value in choosing a path, use the following command in router configuration mode:
The comparison between MEDs is only made if there are no external autonomous systems in the path (an external autonomous system is an autonomous system that is not within the confederation). If there is an external autonomous system in the path, then the external MED is passed transparently through the confederation, and the comparison is not made.
The following example compares route A with these paths:
path= 65000 65004, med=2
path= 65001 65004, med=3
path= 65002 65004, med=4
path= 65003 1, med=1
In this case, path 1 would be chosen if the bgp bestpath med confed router configuration command is enabled. The fourth path has a lower MED, but it is not involved in the MED comparison because there is an external autonomous system is in this path.
Configuring the Router to Use the MED to Choose a Path in a Confederation
To configure the router to use the MED to select the best path from among paths advertised by a single subautonomous system within a confederation, use the following command in router configuration mode:
|
|
|
|---|---|
|
Router(config-router)# bgp deterministic med |
Configures the router to compare the MED variable when choosing among routes advertised by different peers in the same autonomous system. |
Note ![]() If the bgp always-compare-med router configuration command is enabled, all paths are fully comparable, including those from other autonomous systems in the confederation, even if the bgp deterministic med command is also enabled.
If the bgp always-compare-med router configuration command is enabled, all paths are fully comparable, including those from other autonomous systems in the confederation, even if the bgp deterministic med command is also enabled.
Configuring Route Dampening
Route dampening is a BGP feature designed to minimize the propagation of flapping routes across an internetwork. A route is considered to be flapping when it is repeatedly available, then unavailable, then available, then unavailable, and so on.
For example, consider a network with three BGP autonomous systems: autonomous system 1, autonomous system 2, and autonomous system 3. Suppose the route to network A in autonomous system 1 flaps (it becomes unavailable). Under circumstances without route dampening, the eBGP neighbor of autonomous system 1 to autonomous system 2 sends a withdraw message to autonomous system 2. The border router in autonomous system 2, in turn, propagates the withdraw message to autonomous system 3. When the route to network A reappears, autonomous system 1 sends an advertisement message to autonomous system 2, which sends it to autonomous system 3. If the route to network A repeatedly becomes unavailable, then available, many withdrawal and advertisement messages are sent. This is a problem in an internetwork connected to the Internet because a route flap in the Internet backbone usually involves many routes.
Note ![]() No penalty is applied to a BGP peer reset when route dampening is enabled. Although the reset withdraws the route, no penalty is applied in this instance, even if route flap dampening is enabled.
No penalty is applied to a BGP peer reset when route dampening is enabled. Although the reset withdraws the route, no penalty is applied in this instance, even if route flap dampening is enabled.
Minimizing Flapping
The route dampening feature minimizes the flapping problem as follows. Suppose again that the route to network A flaps. The router in autonomous system 2 (where route dampening is enabled) assigns network A a penalty of 1000 and moves it to history state. The router in autonomous system 2 continues to advertise the status of the route to neighbors. The penalties are cumulative. When the route flaps so often that the penalty exceeds a configurable suppress limit, the router stops advertising the route to network A, regardless of how many times it flaps. Thus, the route is dampened.
The penalty placed on network A is decayed until the reuse limit is reached, upon which the route is once again advertised. At half of the reuse limit, the dampening information for the route to network A is removed.
Understanding Route Dampening Terms
The following terms are used when describing route dampening:
•![]() Flap—A route is available, then unavailable, or vice versa.
Flap—A route is available, then unavailable, or vice versa.
•![]() History state—After a route flaps once, it is assigned a penalty and put into history state, meaning the router does not have the best path, based on historical information.
History state—After a route flaps once, it is assigned a penalty and put into history state, meaning the router does not have the best path, based on historical information.
•![]() Penalty—Each time a route flaps, the router configured for route dampening in another autonomous system assigns the route a penalty of 1000. Penalties are cumulative. The penalty for the route is stored in the BGP routing table until the penalty exceeds the suppress limit. At that point, the route state changes from history to damp.
Penalty—Each time a route flaps, the router configured for route dampening in another autonomous system assigns the route a penalty of 1000. Penalties are cumulative. The penalty for the route is stored in the BGP routing table until the penalty exceeds the suppress limit. At that point, the route state changes from history to damp.
•![]() Damp state—In this state, the route has flapped so often that the router will not advertise this route to BGP neighbors.
Damp state—In this state, the route has flapped so often that the router will not advertise this route to BGP neighbors.
•![]() Suppress limit—A route is suppressed when its penalty exceeds this limit. The default value is 2000.
Suppress limit—A route is suppressed when its penalty exceeds this limit. The default value is 2000.
•![]() Half-life—Once the route has been assigned a penalty, the penalty is decreased by half after the half-life period (which is 15 minutes by default). The process of reducing the penalty happens every 5 seconds.
Half-life—Once the route has been assigned a penalty, the penalty is decreased by half after the half-life period (which is 15 minutes by default). The process of reducing the penalty happens every 5 seconds.
•![]() Reuse limit—As the penalty for a flapping route decreases and falls below this reuse limit, the route is unsuppressed. That is, the route is added back to the BGP table and once again used for forwarding. The default reuse limit is 750. The process of unsuppressing routes occurs at 10-second increments. Every 10 seconds, the router finds out which routes are now unsuppressed and advertises them to the world.
Reuse limit—As the penalty for a flapping route decreases and falls below this reuse limit, the route is unsuppressed. That is, the route is added back to the BGP table and once again used for forwarding. The default reuse limit is 750. The process of unsuppressing routes occurs at 10-second increments. Every 10 seconds, the router finds out which routes are now unsuppressed and advertises them to the world.
•![]() Maximum suppress limit—This value is the maximum amount of time a route can be suppressed. The default value is four times the half-life.
Maximum suppress limit—This value is the maximum amount of time a route can be suppressed. The default value is four times the half-life.
The routes external to an autonomous system learned via iBGP are not dampened. This policy prevent the iBGP peers from having a higher penalty for routes external to the autonomous system.
Enabling Route Dampening
To enable BGP route dampening, use the following command in address family or router configuration mode:
|
|
|
|---|---|
|
Router(config)# bgp dampening |
Enables BGP route dampening. |
To change the default values of various dampening factors, use the following command in address family or router configuration mode:
|
|
|
|---|---|
|
Router(config)# bgp dampening half-life reuse suppress max-suppress [route-map map-name] |
Changes the default values of route dampening factors. |
Monitoring and Maintaining BGP Route Dampening
You can monitor the flaps of all the paths that are flapping. The statistics will be deleted once the route is not suppressed and is stable for at least one half-life. To display flap statistics, use the following commands in EXEC mode as needed:
To clear BGP flap statistics (thus making it less likely that the route will be dampened), use the following commands in EXEC mode as needed:
Note ![]() The flap statistics for a route are also cleared when a BGP peer is reset. Although the reset withdraws the route, there is no penalty applied in this instance, even if route flap dampening is enabled.
The flap statistics for a route are also cleared when a BGP peer is reset. Although the reset withdraws the route, there is no penalty applied in this instance, even if route flap dampening is enabled.
Once a route is dampened, you can display BGP route dampening information, including the time remaining before the dampened routes will be unsuppressed. To display the information, use the following command in EXEC mode:
|
|
|
|---|---|
|
Router# show ip bgp dampened-paths |
Displays the dampened routes, including the time remaining before they will be unsuppressed. |
You can clear BGP route dampening information and unsuppress any suppressed routes by using the following command in EXEC mode:
|
|
|
|---|---|
|
Router# clear ip bgp dampening [ip-address network-mask] |
Clears route dampening information and unsuppresses the suppressed routes. |
Monitoring and Maintaining BGP
You can remove all contents of a particular cache, table, or database. You also can display specific statistics. The following sections describe each of these tasks.
Clearing Caches, Tables, and Databases
You can remove all contents of a particular cache, table, or database. Clearing a cache, table, or database can become necessary when the contents of the particular structure have become, or are suspected to be, invalid.
To clear caches, tables, and databases for BGP, use the following commands in EXEC mode, as needed:
Displaying System and Network Statistics
You can display specific statistics such as the contents of BGP routing tables, caches, and databases. Information provided can be used to determine resource utilization and solve network problems. You can also display information about node reachability and discover the routing path that the packets of your device are taking through the network.
To display various routing statistics, use the following commands in EXEC mode, as needed:
Logging Changes in Neighbor Status
To enable the logging of messages generated when a BGP neighbor resets, comes up, or goes down, use the following command in router configuration mode:
|
|
|
|---|---|
|
Router(config-router)# bgp log-neighbor-changes |
Logs messages generated when a BGP neighbor goes up or down, or resets |
BGP Configuration Examples
The following sections provide BGP configuration examples:
•![]() BGP Neighbor Configuration Examples
BGP Neighbor Configuration Examples
•![]() BGP Prefix List Filtering Examples
BGP Prefix List Filtering Examples
•![]() BGP Path Filtering by Neighbor Examples
BGP Path Filtering by Neighbor Examples
•![]() BGP Community with Route Maps Examples
BGP Community with Route Maps Examples
•![]() BGP Conditional Advertisement Configuration Examples
BGP Conditional Advertisement Configuration Examples
•![]() TCP MD5 Authentication for BGP Examples
TCP MD5 Authentication for BGP Examples
BGP Route Map Examples
The following example shows how you can use route maps to modify incoming data from a neighbor. Any route received from 140.222.1.1 that matches the filter parameters set in autonomous system access list 200 will have its weight set to 200 and its local preference set to 250, and it will be accepted.
router bgp 100
!
neighbor 140.222.1.1 route-map FIX-WEIGHT in
neighbor 140.222.1.1 remote-as 1
!
ip as-path access-list 200 permit ^690$
ip as-path access-list 200 permit ^1800
!
route-map FIX-WEIGHT permit 10
match as-path 200
set local-preference 250
set weight200
In the following example, the route map named freddy marks all paths originating from autonomous system 690 with an MED metric attribute of 127. The second permit clause is required so that routes not matching autonomous system path list 1 will still be sent to neighbor 1.1.1.1.
router bgp 100
neighbor 1.1.1.1 route-map freddy out
!
ip as-path access-list 1 permit ^690_
ip as-path access-list 2 permit .*
!
route-map freddy permit 10
match as-path 1
set metric 127
!
route-map freddy permit 20
match as-path 2
The following example shows how you can use route maps to modify redistributed information from the IP forwarding table:
router bgp 100
redistribute igrp 109 route-map igrp2bgp
!
route-map igrp2bgp
match ip address 1
set local-preference 25
set metric 127
set weight 30000
set next-hop 192.92.68.24
set origin igp
!
access-list 1 permit 131.108.0.0 0.0.255.255
access-list 1 permit 160.89.0.0 0.0.255.255
access-list 1 permit 198.112.0.0 0.0.127.255
It is proper behavior to not accept any autonomous system path not matching the match clause of the route map. This behavior means that you will not set the metric and the Cisco IOS software will not accept the route. However, you can configure the software to accept autonomous system paths not matched in the match clause of the route-map router configuration command by using multiple maps of the same name, some without accompanying set commands.
route-map fnord permit 10
match as-path 1
set local-preference 5
!
route-map fnord permit 20
match as-path 2
The following example shows how you can use route maps in a reverse operation to set the route tag (as defined by the BGP/OSPF interaction document, RFC 1403) when exporting routes from BGP into the main IP routing table:
router bgp 100
table-map set_ospf_tag
!
route-map set_ospf_tag
match as-path 1
set automatic-tag
!
ip as-path access-list 1 permit .*
The following example shows how the route map named set-as-path is applied to outbound updates to the neighbor 200.69.232.70. The route map will prepend the autonomous system path “100 100” to routes that pass access list 1. The second part of the route map is to permit the advertisement of other routes.
router bgp 100
network 171.60.0.0
network 172.60.0.0
neighbor 200.69.232.70 remote-as 200
neighbor 200.69.232.70 route-map set-as-path out
!
route-map set-as-path 10 permit
match address 1
set as-path prepend 100 100
!
route-map set-as-path 20 permit
match address 2
!
access-list 1 permit 171.60.0.0 0.0.255.255
access-list 1 permit 172.60.0.0 0.0.255.255
!
access-list 2 permit 0.0.0.0 255.255.255.255
Inbound route maps could perform prefix-based matching and set various parameters of the update. Inbound prefix matching is available in addition to autonomous system path and community list matching. The following example shows how the set local-preference route-map configuration command sets the local preference of the inbound prefix 140.10.0.0/16 to 120:
!
router bgp 100
network 131.108.0.0
neighbor 131.108.1.1 remote-as 200
neighbor 131.108.1.1 route-map set-local-pref in
!
route-map set-local-pref permit 10
match ip address 2
set local preference 120
!
route-map set-local-pref permit 20
!
access-list 2 permit 140.10.0.0 0.0.255.255
access-list 2 deny any
The following examples show how to ensure that traffic from one router on a shared LAN will always be passed through a second router, rather than being sent directly to a third router on the same LAN.
Routers A, B, and C connect to the same LAN. Router A peers with router B, and router B peers with router C. Router B sends traffic over the routes of router A to router C, but wants to make sure that all traffic from router C to router A goes through router B, rather than directly from router C to router A over the shared LAN. This configuration can be useful for traffic accounting purposes or to satisfy the peering agreement between router C and router B. You can achieve this configuration by using the set ip next-hop route-map configuration command as shown in the following two examples.
Example one applies an inbound route map on the BGP session of router C with router B.
Router A Configuration
router bgp 100
neighbor 1.1.1.2 remote-as 200
Router B Configuration
router bgp 200
neighbor 1.1.1.1 remote-as 100
neighbor 1.1.1.3 remote-as 300
Router C Configuration
router bgp 300
neighbor 1.1.1.2 remote-as 200
neighbor 1.1.1.2 route-map set-peer-address in
route-map set-peer-address permit 10
set ip next-hop peer-address
The following example applies an outbound route map on the BGP session of router B with router C:
Router A Configuration
router bgp 100
neighbor 1.1.1.2 remote-as 200
Router B Configuration
router bgp 200
neighbor 1.1.1.1 remote-as 100
neighbor 1.1.1.3 remote-as 300
neighbor 1.1.1.3 route-map set-peer-address out
route-map set-peer-address permit 10
set ip next-hop peer-address
Router C Configuration
router bgp 300
neighbor 1.1.1.2 remote-as 200
BGP Neighbor Configuration Examples
The following example shows how BGP neighbors on an autonomous system are configured to share information. In the example, a BGP router is assigned to autonomous system 109, and two networks are listed as originating in the autonomous system. Then the addresses of three remote routers (and their autonomous systems) are listed. The router being configured will share information about networks 131.108.0.0 and 192.31.7.0 with the neighbor routers. The first router listed is in a different autonomous system; the second neighbor remote-as router configuration command specifies an internal neighbor (with the same autonomous system number) at address 131.108.234.2; and the third neighbor remote-as router configuration command specifies a neighbor on a different autonomous system.
router bgp 109
network 131.108.0.0
network 192.31.7.0
neighbor 131.108.200.1 remote-as 167
neighbor 131.108.234.2 remote-as 109
neighbor 150.136.64.19 remote-as 99
In Figure 58, Router A is being configured. The iBGP neighbor is not directly linked to Router A. External neighbors (in autonomous system 167 and autonomous system 99) must be linked directly to Router A.
Figure 58 Assigning Internal and External BGP Neighbors
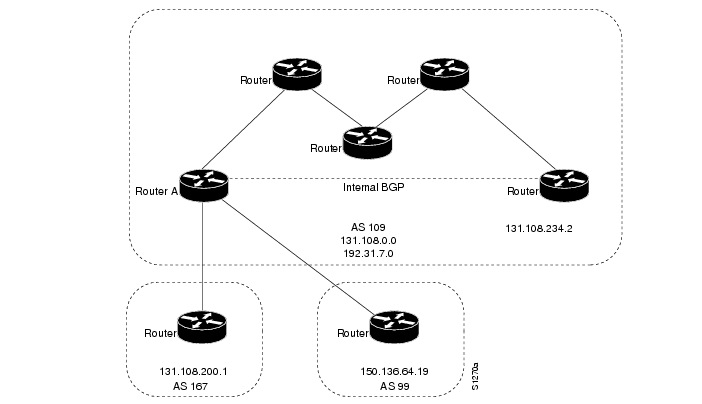
BGP Prefix List Filtering Examples
The following examples show route filtering using a single prefix list and a group of prefixes, and how to add or delete an individual entry from a prefix list.
Route Filtering Configuration Example Using a Single Prefix List
The following example shows how a prefix list denies the default route 0.0.0.0/0:
ip prefix-list abc deny 0.0.0.0/0
The following example shows how a prefix list permits a route that matches the prefix 35.0.0.0/8:
ip prefix-list abc permit 35.0.0.0/8
The following example shows how to configure the BGP process so that it only accept prefixes with a prefix length of /8 to /24:
router bgp
version 2
network 101.20.20.0
distribute-list prefix max24 in
!
ip prefix-list max24 seq 5 permit 0.0.0.0/0 ge 8 le 24
The following example configuration shows how to conditionally originate a default route (0.0.0.0/0) in RIP when a prefix 10.1.1.0/24 exists in the routing table:
ip prefix-list cond permit 10.1.1.0/24
!
route-map default-condition permit 10
match ip address prefix-list cond
!
router rip
default-information originate route-map default-condition
The following example shows how to configure BGP to accept routing updates from 192.1.1.1 only, besides filtering on the prefix length:
router bgp
distribute-list prefix max24 gateway allowlist in
!
ip prefix-list allowlist seq 5 permit 192.1.1.1/32
!
The following example shows how to direct the BGP process to filter incoming updates to the prefix using name1, and match the gateway (next hop) of the prefix being updated to the prefix list name2, on the Ethernet interface 0:
router bgp 103
distribute-list prefix name1 gateway name2 in ethernet 0.
Route Filtering Configuration Example Specifying a Group of Prefixes
The following example shows how to configure BGP to permit routes with a prefix length up to 24 in network 192/8:
ip prefix-list abc permit 192.0.0.0/8 le 24
The following example shows how to configure BGP to deny routes with a prefix length greater than in 25 in 192/8:
ip prefix-list abc deny 192.0.0.0/8 ge 25
The following example shows how to configure BGP to permit routes with a prefix length greater than 8 and less than 24 in all address space:
ip prefix-list abc permit 0.0.0.0/0 ge 8 le 24
The following example shows how to configure BGP to deny routes with a prefix length greater than 25 in all address space:
ip prefix-list abc deny 0.0.0.0/0 ge 25
The following example shows how to configure BGP to deny all routes in 10/8, because any route in the Class A network 10.0.0.0/8 is denied if its mask is less than or equal to 32 bits:
ip prefix-list abc deny 10.0.0.0/8 le 32
The following example shows how to configure BGP to deny routes with a mask greater than 25 in 204.70.1/24:
ip prefix-list abc deny 204.70.1.0/24 ge 25
The following example shows how to configure BGP to permit all routes:
ip prefix-list abc permit 0.0.0.0/0 le 32
Added or Deleted Prefix List Entries Examples
You can add or delete individual entries in a prefix list if a prefix list has the following initial configuration:
ip prefix-list abc deny 0.0.0.0/0 le 7
ip prefix-list abc deny 0.0.0.0/0 ge 25
ip prefix-list abc permit 35.0.0.0/8
ip prefix-list abc permit 204.70.0.0/15
The following example shows how to delete an entry from the prefix list so that 204.70.0.0 is not permitted, and add a new entry that permits 198.0.0.0/8:
no ip prefix-list abc permit 204.70.0.0/15
ip prefix-list abc permit 198.0.0.0/8
The new configuration is as follows:
ip prefix-list abc deny 0.0.0.0/0 le 7
ip prefix-list abc deny 0.0.0.0/0 ge 25
ip prefix-list abc permit 35.0.0.0/8
ip prefix-list abc permit 198.0.0.0/8
BGP Soft Reset Examples
The following examples show two ways to reset the connection for BGP peer 131.108.1.1.
Dynamic Inbound Soft Reset Example
The following examples shows the clear ip bgp 131.108.1.1 soft in EXEC command used to initiate a dynamic soft reconfiguration in the BGP peer 131.108.1.1. This command requires that the peer support the route refresh capability.
clear ip bgp 131.108.1.1 soft in
Inbound Soft Reset Using Stored Information Example
The following example shows how to enable inbound soft reconfiguration for the neighbor 131.108.1.1. All the updates received from this neighbor will be stored unmodified, regardless of the inbound policy. When inbound soft reconfiguration is performed later, the stored information will be used to generate a new set of inbound updates.
router bgp 100
neighbor 131.108.1.1 remote-as 200
neighbor 131.108.1.1 soft-reconfiguration inbound
The following example clears the session with the neighbor 131.108.1.1.
clear ip bgp 131.108.1.1 soft in
BGP Synchronization Examples
The example shown in Figure 59 shows how to use the no synchronization router configuration command. In the figure, synchronization is on, and Router B does not advertise network 198.92.68.0 to Router A until an IGRP route for network 198.92.68.0 exists. If you specify the no synchronization router configuration command, Router B advertises network 198.92.68.0 as soon as possible. However, because routing information still must be sent to interior peers, you must configure a full iBGP mesh.
Figure 59 BGP Synchronization Configuration
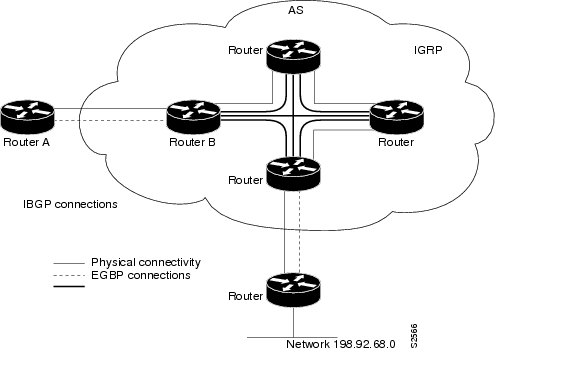
BGP Path Filtering by Neighbor Examples
The following example shows BGP path filtering by neighbor. Only the routes that pass autonomous system path access list 2 will be sent to 193.1.12.10. Similarly, only routes passing access list 3 will be accepted from 193.1.12.10.
router bgp 200
neighbor 193.1.12.10 remote-as 100
neighbor 193.1.12.10 filter-list 1 out
neighbor 193.1.12.10 filter-list 2 in
ip as-path access-list 1 permit _109_
ip as-path access-list 2 permit _200$
ip as-path access-list 2 permit ^100$
ip as-path access-list 3 deny _690$
ip as-path access-list 3 permit .*
BGP Aggregate Route Examples
The following examples show how you can use aggregate routes in BGP either by redistributing an aggregate route into BGP or by using the BGP Conditional Aggregate routing feature.
In the following example, the redistribute static router configuration command is used to redistribute aggregate route 193.0.0.0:
ip route 193.0.0.0 255.0.0.0 null 0
!
router bgp 100
redistribute static
The following configuration shows how to create an aggregate entry in the BGP routing table when at least one specific route falls into the specified range. The aggregate route will be advertised as coming from your autonomous system and has the atomic aggregate attribute set to show that information might be missing. (By default, atomic aggregate is set unless you use the as-set keyword in the aggregate-address router configuration command.)
router bgp 100
aggregate-address 193.0.0.0 255.0.0.0
The following example shows how to create an aggregate entry using the same rules as in the previous example, but the path advertised for this route will be an AS_SET consisting of all elements contained in all paths that are being summarized:
router bgp 100
aggregate-address 193.0.0.0 255.0.0.0 as-set
The following example shows how to create the aggregate route for 193.0.0.0 and also suppress advertisements of more specific routes to all neighbors:
router bgp 100
aggregate-address 193.0.0.0 255.0.0.0 summary-only
BGP Community with Route Maps Examples
This section contains three examples of the use of BGP communities with route maps, and two examples that also contain confederation configurations. For an example of how to configure a BGP confederation, see the section “BGP Confederation Examples” in this chapter.
The first example shows how the route map named set-community is applied to the outbound updates to the neighbor 171.69.232.50. The routes that pass access list 1 have the special community attribute value no-export. The remaining routes are advertised normally. This special community value automatically prevents the advertisement of those routes by the BGP speakers in autonomous system 200.
router bgp 100
neighbor 171.69.232.50 remote-as 200
neighbor 171.69.232.50 send-community
neighbor 171.69.232.50 route-map set-community out
!
route-map set-community 10 permit
match address 1
set community no-export
!
route-map set-community 20 permit
match address 2
The second example shows how the route map named set-community is applied to the outbound updates to neighbor 171.69.232.90. All the routes that originate from autonomous system 70 have the community values 200 200 added to their already existing values. All other routes are advertised as normal.
route-map bgp 200
neighbor 171.69.232.90 remote-as 100
neighbor 171.69.232.90 send-community
neighbor 171.69.232.90 route-map set-community out
!
route-map set-community 10 permit
match as-path 1
set community 200 200 additive
!
route-map set-community 20 permit
!
ip as-path access-list 1 permit 70$
ip as-path access-list 2 permit .*
The third example shows how community-based matching is used to selectively set MED and local preference for routes from neighbor 171.69.232.55. All the routes that match community list 1 get the MED set to 8000, including any routes that have the communities 100 200 300 or 900 901. These routes could have other community values also.
All the routes that pass community list 2 get the local preference set to 500. This includes the routes that have community values 88 or 90. If they belong to any other community, they will not be matched by community list 2.
All the routes that match community list 3 get the local preference set to 50. Community list 3 will match all the routes because all the routes are members of the Internet community. Thus, all the remaining routes from neighbor 171.69.232.55 get a local preference 50.
router bgp 200
neighbor 171.69.232.55 remote-as 100
neighbor 171.69.232.55 route-map filter-on-community in
!
route-map filter-on-community 10 permit
match community 1
set metric 8000
!
route-map filter-on-community 20 permit
match community 2 exact-match
set local-preference 500
!
route-map filter-on-community 30 permit
match community 3
set local-preference 50
!
ip community-list 1 permit 100 200 300
ip community-list 1 permit 900 901
!
ip community-list 2 permit 88
ip community-list 2 permit 90
!
ip community-list 3 permit internet
The next two examples show how BGP community attributes are used with BGP confederation configurations to filter routes.
The next example shows how the route map named set-community is applied to the outbound updates to neighbor 171.69.232.50 and the local-as community attribute is used to filter the routes. The routes that pass access list 1 have the special community attribute value local-as. The remaining routes are advertised normally. This special community value automatically prevents the advertisement of those routes by the BGP speakers outside autonomous system 200.
router bgp 65000
network 1.0.0.0 route-map set-community
bgp confederation identifier 200
bgp confederation peers 65001
neighbor 171.69.232.50 remote-as 100
neighbor 171.69.233.2 remote-as 65001
!
route-map set-community permit 10
match ip address 1
set community local-as
!
The following example shows how to use the local-as community attribute to filter the routes. Confederation 100 contains three autonomous systems: 100, 200, and 300. For network 1.0.0.0, the route map named set-local-as specifies that the advertised routes have the community attribute local-as. These routes are not advertised to any eBGP peer outside the local autonomous system. For network 2.0.0.0, the route map named set-no-export specifies that the routes advertised have the community attribute no-export.
A route between router 6500 and router 65001 does not cross the boundary between autonomous systems within the confederation. A route between subautonomous systems for which router 65000 is the controlling router does not cross the boundary between the confederation and an external autonomous system, and also does not cross the boundary between subautonomous systems within the local autonomous system. A route to from router 65000 to router 65001 would not be acceptable for network 1.0.0.0 because it crosses the boundary between subautonomous systems within the confederation.
router bgp 65001
bgp confederation identifier 200
bgp confederation peer 65000
network 2.0.0.0 route-map set-community
neighbor 171.69.233.1 remote-as 65000
route-map set-community permit 10
set community no-export
BGP Conditional Advertisement Configuration Examples
This section provides a configuration example of the BGP Conditional Advertisement feature. In the following example, the ip-address argument refers to the IP address of the neighbor, and the map1-name and map2-name arguments, refer to the names of the route maps:
neighbor{ip-address} advertise-map {map1-name} non-exist-map {map2-name}
no neighbor{ip-address} advertise-map {map1-name} non-exist-map {map2-name}
The route map associated with the non-exist-map specifies the prefix that the BGP speaker tracks. The route map associated with the advertise map specifies the prefix that is advertised when the prefix in the non-exist-map no longer exists. The prefix tracked by the BGP speaker must be present in the BGP table for the conditional advertisement not to take place. In the following example, the router advertises 172.16.0.0/16 to its neighbor only if 192.168.7.0/24 is not present in the IP routing table.
To conditionally advertise a set of routes, use the following commands in router configuration mode:
ip prefix-list BLUE permit 172.16.0.0
ip prefix-list RED permit 192.168.7.0
!
route-map map1-name permit 10
match ip address prefix-list BLUE
!
route-map map2-name permit 10
match ip address prefix-list RED
!
router bgp 100
neighbor 10.89.2.33 remote-as 2051
neighbor 10.89.2.33 advertise-map map1-name non-exist-map map2-name
!
BGP Confederation Examples
The following is a sample configuration that shows several peers in a confederation. The confederation consists of three internal autonomous systems with autonomous system numbers 6001, 6002, and 6003. To the BGP speakers outside the confederation, the confederation looks like a normal autonomous system with autonomous system number 60000 (specified via the bgp confederation identifier router configuration command).
In a BGP speaker in autonomous system 6001, the bgp confederation peers router configuration command marks the peers from autonomous systems 6002 and 6003 as special eBGP peers. Hence peers 171.69.232.55 and 171.69.232.56 will get the local preference, next hop, and MED unmodified in the updates. The router at 160.69.69.1 is a normal eBGP speaker and the updates received by it from this peer will be just like a normal eBGP update from a peer in autonomous system 60000.
router bgp 6001
bgp confederation identifier 60000
bgp confederation peers 6002 6003
neighbor 171.69.232.55 remote-as 6002
neighbor 171.69.232.56 remote-as 6003
neighbor 160.69.69.1 remote-as 777
In a BGP speaker in autonomous system 6002, the peers from autonomous systems 6001 and 6003 are configured as special eBGP peers. 170.70.70.1 is a normal iBGP peer and 199.99.99.2 is a normal eBGP peer from autonomous system 700.
router bgp 6002
bgp confederation identifier 60000
bgp confederation peers 6001 6003
neighbor 170.70.70.1 remote-as 6002
neighbor 171.69.232.57 remote-as 6001
neighbor 171.69.232.56 remote-as 6003
neighbor 199.99.99.2 remote-as 700
In a BGP speaker in autonomous system 6003, the peers from autonomous systems 6001 and 6002 are configured as special eBGP peers. 200.200.200.200 is a normal eBGP peer from autonomous system 701.
router bgp 6003
bgp confederation identifier 60000
bgp confederation peers 6001 6002
neighbor 171.69.232.57 remote-as 6001
neighbor 171.69.232.55 remote-as 6002
neighbor 200.200.200.200 remote-as 701
The following is a part of the configuration from the BGP speaker 200.200.200.205 from autonomous system 701 in the same example. Neighbor 171.69.232.56 is configured as a normal eBGP speaker from autonomous system 60000. The internal division of the autonomous system into multiple autonomous systems is not known to the peers external to the confederation.
router bgp 701
neighbor 171.69.232.56 remote-as 60000
neighbor 200.200.200.205 remote-as 701
For examples of how the BGP set-community route-map configuration command can be used with a confederation configuration, see the last two examples in the section“BGP Community with Route Maps Examples” in this chapter.
BGP Peer Group Examples
This section contains an iBGP peer group example and an eBGP peer group example.
iBGP Peer Group Example
The following example shows how the peer group named internal configures the members of the peer group to be iBGP neighbors. By definition, this is an iBGP peer group because the router bgp global configuration command and the neighbor remote-as router configuration command indicate the same autonomous system (in this case, autonomous system 100). All the peer group members use loopback 0 as the update source and use set-med as the outbound route map. The example also shows that, except for the neighbor at address 171.69.232.55, all the neighbors have filter list 2 as the inbound filter list.
router bgp 100
neighbor internal peer-group
neighbor internal remote-as 100
neighbor internal update-source loopback 0
neighbor internal route-map set-med out
neighbor internal filter-list 1 out
neighbor internal filter-list 2 in
neighbor 171.69.232.53 peer-group internal
neighbor 171.69.232.54 peer-group internal
neighbor 171.69.232.55 peer-group internal
neighbor 171.69.232.55 filter-list 3 in
eBGP Peer Group Example
The following example shows how the peer group named external-peers is defined without the neighbor remote-as router configuration command, making it an eBGP peer group. Each member of the peer group is configured with its respective autonomous system number separately. Thus, the peer group consists of members from autonomous systems 200, 300, and 400. All the peer group members have set-metric route map as an outbound route map and filter list 99 as an outbound filter list. Except for neighbor 171.69.232.110, all have 101 as the inbound filter list.
router bgp 100
neighbor external-peers peer-group
neighbor external-peers route-map set-metric out
neighbor external-peers filter-list 99 out
neighbor external-peers filter-list 101 in
neighbor 171.69.232.90 remote-as 200
neighbor 171.69.232.90 peer-group external-peers
neighbor 171.69.232.100 remote-as 300
neighbor 171.69.232.100 peer-group external-peers
neighbor 171.69.232.110 remote-as 400
neighbor 171.69.232.110 peer-group external-peers
neighbor 171.69.232.110 filter-list 400 in
TCP MD5 Authentication for BGP Examples
The following example enables the authentication feature between this router and the BGP neighbor at 10.108.1.1. The password that must also be configured for the neighbor is bla4u00=2nkq.The remote peer must be configured before the holddown timer expires.
router bgp 109
neighbor 10.108.1.1 password bla4u00=2nkq
Was this Document Helpful?
Yes No Feedback
- Sample Configuration for BGP with Two Different Service Providers (Multihoming)
- Sample Configuration for iBGP and eBGP With or Without a Loopback Address
- BGP: Frequently Asked Questions
- + 3
Let Us Help
- Open a Support Case

- (Requires a Cisco Service Contract)
Campus Wired LAN Design Guide
Optimize your network with a validated design.

